Home / Guides / Record system audio in Ableton Live
How to Record System Audio in Ableton Live
Ableton Live doesn't ship with a built-in way to record system audio — the sound coming out of Spotify, YouTube, Zoom, your browser, or any other app — into a Live Set. This guide walks through the workflow using AudioRoute. As of v0.2.0 there are two flavours of the AudioRoute plug-in (Audio Effect and Instrument); pick the one that matches your starting point and follow that section linearly. Both use Live's Sends Only + 2-track pattern. No BlackHole, no aggregate device, no output rerouting.
Why this is hard in Live by default
Ableton Live can record audio from any input device — an audio interface, a USB microphone, the Mac's built-in mic. But "system audio" isn't an input device. Your operating system routes whatever you're playing through whatever output you've selected (built-in speakers, headphones, an audio interface, AirPlay), and there's no built-in "system output as input" device for Live to pick.
The conventional workarounds treat system audio as a routing problem:
- BlackHole installs a virtual audio device. You then create an aggregate or multi-output device in Audio MIDI Setup that combines BlackHole with your real speakers, so you can still hear what's being routed. It works, but it hijacks your output routing and breaks the moment you change devices.
- Loopback wraps the same idea in a friendlier UI, for a higher price. Same underlying model.
- Stereo Mix on Windows exists on some interfaces, was deprecated on most, and is unreliable across hardware.
AudioRoute takes a different approach. Instead of rerouting your output through a virtual device, it quietly observes whatever your computer is already playing. Your speakers, headphones, or audio interface keep working exactly as they did, and AudioRoute simply gets a parallel copy of the audio to deliver into Live. No aggregate device, no rerouting, no Audio MIDI Setup. More on how it works under the hood if you're curious.
That observation copy is delivered into Live as a VST3 plugin you instantiate on a MIDI track. AudioRoute Capture registers as a VST3 Instrument (a plugin that produces audio rather than processes existing audio — same category as a synth), so Live hosts it on a MIDI track. The MIDI track's audio output is then routed into a regular audio track that writes the captured audio to disk when you record.
Two ways to load AudioRoute — which to pick
AudioRoute 0.2.0 ships the capture plug-in in two flavours. They share the same daemon and produce identical capture; the difference is which track type the plug-in lives on, which changes where you load it from in Live:
| If you… | Use | Where it lives in Live |
|---|---|---|
| Are setting up a new Live Set | AudioRoute Capture FX (Audio Effect) | Plug-Ins browser → AudioRoute → AudioRoute Capture FX. Drop onto an Audio track. Recommended path going forward. |
| Are opening a Live Set that already had AudioRoute loaded before 0.2.0 | AudioRoute Capture (Instrument) | Plug-Ins browser → AudioRoute → AudioRoute Capture. Drop onto a MIDI track. The original variant, byte-identical plug-in ID, so old Sets auto-load it. |
Both flavours end up with the same 2-track topology in Live (source track + destination Audio track receiving via 1-Audio input from the source's Sends Only output) because Live's recording engine captures a track's input, not its post-FX output. The Effect variant lives on an Audio track in the standard insert chain — where most engineers will instinctively look for a "process this track" plug-in — while the Instrument variant lives on a MIDI track for historical reasons (the plug-in was categorized as a VST3 Instrument before 0.2.0).
Pick a section and follow it linearly — the two flows don't interleave.
What you'll need
- macOS 14.2 (Sonoma) or later, or Windows 10 or later — AudioRoute requires the CoreAudio process tap APIs that Apple shipped in macOS 14, or WASAPI process loopback on Windows.
- Ableton Live 11 or later — this guide was written using Live 12, but the workflow is identical on Live 11.
- AudioRoute 0.2.0 or later — the free 14-day trial covers the whole workflow. €29 lifetime license. On 0.1.x the FX variant won't appear under Audio Effects — update first.
Once AudioRoute is installed, Live will see both AudioRoute Capture FX (Audio Effect) and AudioRoute Capture (Instrument) as available VST3 plug-ins on its next scan. If neither appears, open Live's Preferences → Plug-Ins and confirm Use VST3 Plug-In System Folders is enabled, then click Rescan.
Section A — Using AudioRoute Capture FX (Audio Effect)
This is the recommended workflow for new Live Sets. AudioRoute Capture FX drops onto an Audio track as a regular Audio Effect. A second Audio track receives the processed signal via Live's Audio From: 1-Audio input and records to disk. The source track's output is set to Sends Only so the captured audio doesn't reach the master and create a feedback loop through AR's tap.
Step 1
Drop AudioRoute Capture FX on an Audio track
Open Live's browser on the left. Under Categories → Plug-Ins, expand AudioRoute. You'll see both plug-ins side by side:
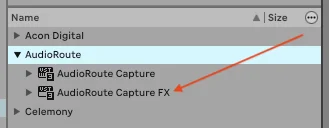
Drag AudioRoute Capture FX onto an Audio track in your Set (Audio 1 in the screenshots below). The plug-in window opens. The first time you load any AudioRoute plug-in, you'll see an "⚠ Output to DAW is muted" warning — click Enable Output to DAW to start sending captured audio into the track.
Step 2
Set the track's Audio To → Sends Only
On Audio 1's I/O strip, click the Audio To dropdown (defaults to Main). Pick Sends Only.
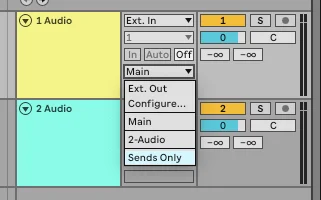
Why Sends Only matters. If Audio 1 routed to Main, the captured system audio would play out the speakers, AR's tap would re-capture it, and you'd hear an escalating feedback loop. Sends Only is Live's native way to break that path while keeping the signal available for other tracks to listen to.
Step 3
Add a second Audio track, Audio From → 1-Audio
Add an empty Audio track (call it Audio 2). On its I/O strip, click the Audio From dropdown and pick 1-Audio — this taps Audio 1's output. Live will also expose a sub-dropdown for tap point; leave it on Post Mixer (the default), which gives you the post-FX signal.
Step 4
Arm and record
On Audio 2:
- Set Monitor to Off — Audio 2 will record what's coming in without also sending it to Main (which would create the same feedback path Sends Only is preventing on Audio 1).
- Click the round red Arm button on Audio 2's track header.
Start your source audio playing (Spotify, browser, Zoom, etc.), then hit the global Record button in Live's transport (or the keyboard shortcut F9 on macOS). The captured audio is recorded onto Audio 2 as a regular audio clip.
That's the Effect-flavour setup — four steps, two tracks. Save it as a Live template and the next session is one open + one record arm.
Section B — Using AudioRoute Capture (Instrument, for existing sessions)
This is the original AudioRoute Capture plug-in (the Instrument flavour, loaded on a Live MIDI track). Use it if you have a Live Set that loaded AudioRoute before 0.2.0 — it will auto-load with the same plug-in identifier and your existing routing stays intact. For new Sets, prefer Section A above.
Step 1
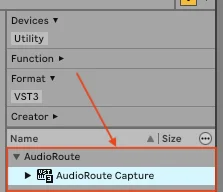
Find AudioRoute Capture in the plug-in browser
Open Live's browser on the left. Under Categories, go to Plug-Ins, then expand the VST3 section. You'll see a list of vendors. Find AudioRoute and expand it — AudioRoute Capture is the plugin inside.
Step 2
Drop AudioRoute Capture on a MIDI track
Drag AudioRoute Capture from the browser onto an empty MIDI track in your Live Set, or onto the empty drop area below your last track to create a new MIDI track with the plugin pre-loaded. Live always lands instrument-category plugins on MIDI tracks — AudioRoute Capture is one of them, since it produces audio rather than processing it. Trying to drop it on an audio track won't work; Live will refuse the drop.
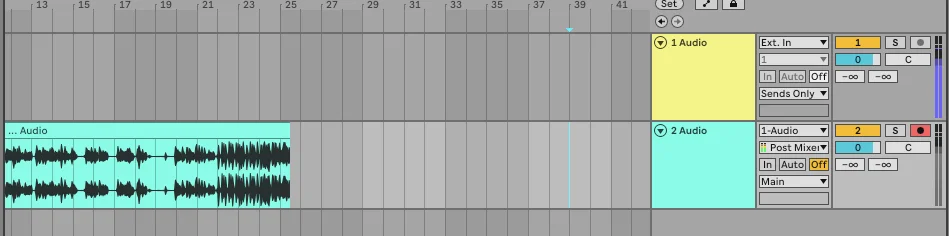
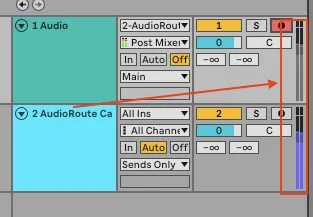
This MIDI track is the source track — it hosts the plugin and produces the captured audio (the same way a synth on a MIDI track produces audio when you play notes, except here the audio comes from your system instead of MIDI input). In the screenshot below, it's the track labelled 2 AudioRoute Ca.
Above it, track 1 Audio is a regular empty audio track that we'll use as the destination track in a moment — the one that actually writes the captured audio to disk when you record.
Why a MIDI track and not an audio track? AudioRoute Capture is registered in its VST3 manifest as an Instrument, since it generates audio rather than processing existing audio. Live filters track-type acceptance strictly by plugin category, so instrument-category plugins go on MIDI tracks — same as a synth or sampler. The track is still called a MIDI track for historical reasons; what it actually outputs is the audio from the plugin, which is what we route into the destination audio track in the next steps.
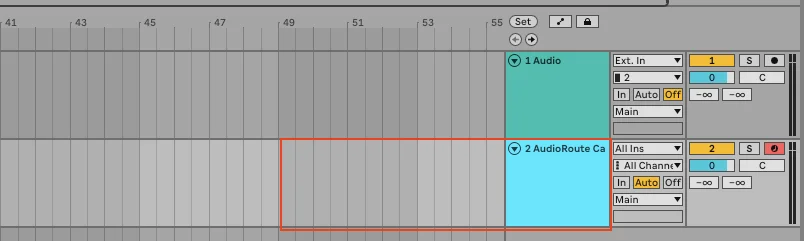
How to verify the source track is MIDI. Toggle the In/Out section in the mixer (Cmd+Option+I on Mac, Ctrl+Alt+I on Windows) and look at the source track's input area:
- MIDI track: input shows All Ins with a channel selector below it (often All Channels). Opening the input dropdown lists Computer Keyboard among the options.
- Audio track: input shows Ext. In with a channel-pair number (1, 2, etc.) below it. No Computer Keyboard option in the dropdown.
If "Computer Keyboard" appears in the input dropdown, it's a MIDI track — that's the most reliable single tell. The default track colours (salmon = audio, magenta = MIDI in Live 12) are a secondary visual cue but less reliable since tracks can be recoloured.
Why two tracks? The MIDI track that hosts AudioRoute Capture is producing audio, but Live records what comes into a track, not what comes out of one. So we route the source track's output into the destination audio track's input, and arm the destination. Live happily writes the captured audio to disk on the destination.
Step 3
Enable Output to DAW in the plugin
The AudioRoute Capture plugin window opens. The first time you load it, you'll see an "Output to DAW is muted" notice with a big blue Enable Output to DAW button. This is intentional. The plugin starts in a safe state on first launch so that it can't accidentally create a feedback loop before you've finished setting up your routing.
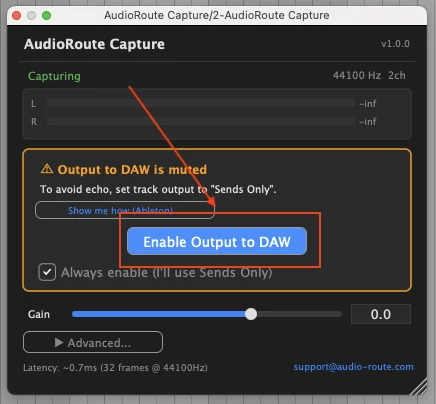
You'll also see a checkbox labelled "Always enable (I'll use Sends Only)". Leave it unticked until you've finished setting up the Sends Only routing in Step 4 — then tick it on your next session so the warning doesn't reappear.
Why the safety? If you click Enable Output to DAW right now and your source track is sending its output to Master, the plugin's captured audio reaches your speakers, the system capture immediately picks it up again, and the signal loops — instant howl. The next step prevents that by changing where the source track's audio goes.
Step 4
Set the source track's output to Sends Only
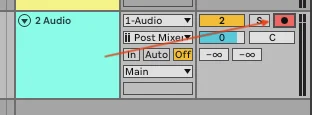
On the source track (2 AudioRoute Ca in our example), find the Audio To dropdown in the In/Out section of the mixer. By default it's set to Main — meaning the track's audio goes to your master output and out to your speakers. Click it and choose Sends Only.
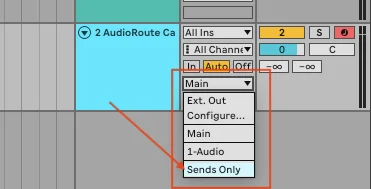
What Sends Only does. The track still produces audio internally and that signal is still available to other tracks via Live's internal routing — which is exactly what we need in the next step. But the track no longer feeds Master, so nothing reaches your speakers from this path. AudioRoute captures system audio, plays it into the source track, and the loop ends right there. No feedback possible.
Now go back to the plugin window from Step 3 and click Enable Output to DAW. Play any audio in another app — a YouTube tab, Spotify, an open Zoom call, anything. You should immediately see the L/R meters in the plugin window start moving.
Step 5
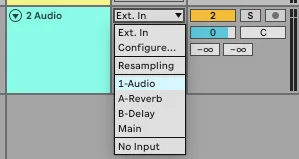
Set the destination track's input to the source track
On the destination track (1 Audio), find the Audio From dropdown in the In/Out section. By default it's set to Ext. In (your external audio interface inputs). Click it and pick 2-AudioRoute Capture — Live lists every other track in the Set as a possible internal source.
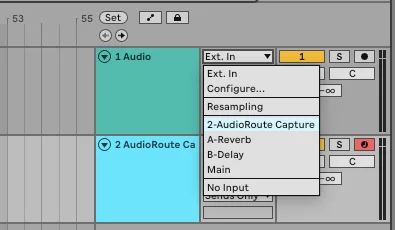
Below the input dropdown there's a second dropdown labelled by default Pre FX / Post FX / Post Mixer. Set it to Post Mixer. This tells Live to tap the source track's signal after the AudioRoute Capture plugin has done its work — which is what you want; you're recording the plugin's output, not whatever was on the track before it.
Why input routing? Ableton records what enters a track's input. By routing the source track's signal into the destination track's input, we make the captured system audio the thing Live writes to disk when we arm and record. Without this routing, the destination track would record silence (or your microphone, if Ext. In was still selected).
Step 6
Arm the destination track
Click the Arm button on the destination track (the round red button on the right of the track mixer). The track turns red to indicate it's ready to record.
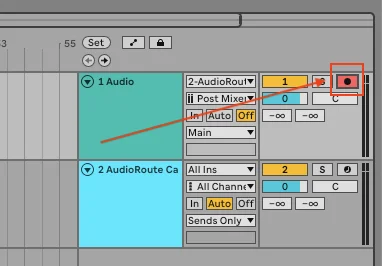
Set the Monitor switch on the destination track to Off (the three-button switch labelled In / Auto / Off). With monitoring off, the destination track records the incoming signal but doesn't play it back through Master while recording — another safeguard against feedback.
If both tracks are wired correctly, you'll now see meters moving on both tracks when system audio is playing: the source track shows the plugin's output level, and the destination track shows the same signal coming in via its input.
Step 7
Hit the global Record button
In Live's top transport bar, click the global Record button (the round red circle next to the play and stop transports). Live begins writing the captured audio to a clip on the destination track. Click Stop (or the spacebar) when you've captured enough.
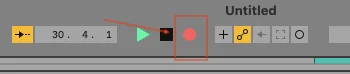
You'll see the captured waveform appear on the destination track as a real audio clip — the same kind of clip you'd get from recording a microphone or an audio interface input. Edit it, warp it, export it, drop it into Session view, do whatever you'd normally do with audio.

That's the whole setup. The first time it feels like a lot of steps; every project after that is two clicks once you save this as a template — the AudioRoute Capture plugin, the Sends Only routing, the input wiring, and the armed destination track all persist in saved Live Sets.
Common gotchas
Feedback howl when I hit record
Almost always means one of two things: the source track's Audio To is still Main rather than Sends Only, or the destination track's Monitor switch is set to In or Auto rather than Off. Either of those puts the captured signal back into Master, system capture picks it up again, and the loop closes.
The clean rule: no audio from the AudioRoute path should reach Master while recording. Sends Only on the source track plus Monitor Off on the destination track gets you there. Wearing headphones is a quick-and-dirty alternative if you just want a clean take without thinking about routing.
Meters are flat — no signal at all
Check, in this order:
- The AudioRoute icon is visible in your menu bar / system tray — that confirms the capture daemon is running.
- Something is actually playing through your system output. If your Mac or Windows output is muted, AudioRoute has nothing to capture.
- Inside the AudioRoute Capture plugin window, Output to DAW is enabled (not muted by the safety default from Step 3).
- The destination track's Audio From is the source track (not
Ext. InorNo Input), and the second dropdown is Post Mixer.
Recording sounds quiet (or too loud)
The plugin passes audio through at unity gain by default. Check the Gain slider in the plugin window — it should be at 0.0 dB unless you've adjusted it. The L/R meter levels you see inside the plugin are exactly what'll be written to disk on the destination track. If you need to attenuate or boost, do it with the plugin's Gain slider before recording, or as a fader move on the destination track during playback.
I can't hear what I'm capturing
That's by design when you set up Sends Only on the source track and Monitor Off on the destination — neither path is sending the captured audio to Master, which is exactly what prevents feedback. You still hear the original playback (Spotify, YouTube, etc.) through your normal speakers, because AudioRoute taps a parallel copy without altering your normal output routing. If you want to hear the recording while it's happening, the cleanest approach is to wear headphones plugged into a different output than the one your system audio is using.
"Always enable (I'll use Sends Only)" — should I tick it?
Tick it after you've completed Step 4 and confirmed your routing is feedback-safe. The checkbox tells the plugin to skip the safety prompt on future launches, so when you reopen a saved Live Set, AudioRoute Capture is ready to pass audio immediately. Leave it unticked if you'd prefer to be reminded every time.
Alternative: single-track recording via AudioRoute Input
The two-track architecture above is the canonical workflow for routing AudioRoute Capture as a live VST3 plugin inside Live. But there's a simpler alternative that uses Live's regular audio input system instead of the plugin: the AudioRoute Input virtual audio device that ships with AudioRoute. This appears in Windows / macOS as a sound input device, so Live can read from it like it would read from a microphone or audio interface input.
Trade-off: simpler (single track, no plugin, no Sends Only routing) but you give up the in-DAW plugin meters and per-instance plugin control. For many users — podcasters, lecture-recorders, anyone who just wants the captured audio as a clip in their Live Set — that's a perfectly fine trade.
Setup (one-time)
Live can only use one audio device at a time. If you already use a separate audio interface (Focusrite, etc.) for Live, you'll need an aggregate device that combines your interface with AudioRoute Input. If you don't use a separate interface, you can point Live directly at AudioRoute Input.
If you use an audio interface (recommended path):
- macOS: open Audio MIDI Setup (in
/Applications/Utilities/) → click the + → Create Aggregate Device. Tick both your audio interface AND AudioRoute Input. Name it something memorable (e.g., "AR + Focusrite"). - Windows: Live can route through ASIO drivers that wrap multiple devices, or you can use Voicemeeter as the aggregator (irony noted — only for combining devices, not for actual routing). Simpler if you're on Windows: point Live directly at AudioRoute Input (see below) and accept that your interface isn't simultaneously available.
- In Live: Preferences → Audio → Audio Input Device → pick the aggregate device.
- In Live: Preferences → Audio → Input Config → enable the channel pair that corresponds to AudioRoute Input (the aggregate exposes channels for each device combined into it).
If you don't use a separate interface:
- In Live: Preferences → Audio → Audio Input Device → pick AudioRoute Input directly.
- Preferences → Audio → Audio Output Device → pick your built-in / headphones (a different device from AudioRoute Input).
Recording (per session)
- Create a new audio track in your Live Set.
- Set Audio From → Ext. In → the channel pair for AudioRoute Input (e.g.,
1/2). - Sub-dropdown: Post Mixer (or Pre FX — either works because there's no FX in the path).
- Monitor: Off (prevents the playback you're capturing from also playing back through Live).
- Arm the track.
- Hit the global Record button. Single-track recording starts.
The track records AudioRoute's captured system audio as a clip, exactly as if it were coming from a real audio input.
Why this works: Live's recording mechanism is "record whatever enters the track's input." Since AudioRoute Input registers as a regular audio input device with the OS, Live treats its signal the same as any audio interface input. No plugin in the chain — the captured audio enters Live at the recording tap point directly.
macOS microphone permission required. Because AudioRoute Input registers as an audio input device, macOS treats it the same as a microphone for privacy. The first time you arm a track with AudioRoute Input as the source, macOS prompts Live for microphone access. Grant it — otherwise the track records silence with no warning. See the same gotcha in the Acoustica guide for a deeper explanation.
Shortcut: skip Live, capture straight to WAV
If your goal is just "I need a WAV file of what's playing" and you don't need Ableton's editing, AudioRoute can do that directly from the menu bar / system tray app. No Live Set, no source track, no Sends Only routing.
Click the AudioRoute icon in your menu bar (macOS) or system tray (Windows) and pick Start Recording. It captures to your configured recording folder at your chosen sample rate and bit depth. Click Stop Recording when done. The file is ready to drop into anything that opens a WAV — including Live, if you want to import it later.
Same plugin under the hood, zero DAW setup. Useful for quick one-offs — capturing a snippet of a lecture, grabbing a sample from a YouTube tutorial, recording a Zoom call without setting up a session.
Related guides
- Record system audio on Mac (no DAW required) — the simpler workflow when you don't need Live in the loop.
- Record system audio on Windows (no DAW required) — same simple workflow, Windows version.
- Record system audio in Logic Pro — same idea, Logic-specific routing.
- Record system audio in Reaper — cross-platform DAW workflow.
- Record system audio in Cubase — the Cubase Pro / Artist routing version.
- Record system audio in GarageBand — the short version for Mac users who already have GarageBand installed.
- AudioRoute vs BlackHole — honest comparison and 5-minute migration.
Try AudioRoute on your next session
Free 14-day trial, no credit card. €29 lifetime license, all future updates included.
Download AudioRoute View pricing