Home / Guides / Record system audio in GarageBand
How to Record System Audio in GarageBand
GarageBand can record from any input device your Mac exposes — a mic, an audio interface, the built-in mic — but "system audio" isn't a device by default. This guide walks through the workflow using AudioRoute's virtual input, which appears in GarageBand's input picker exactly like a piece of hardware would. No aggregate device, no Audio MIDI Setup, no output rerouting. About three minutes end to end.
GarageBand has no built-in system-audio recorder, but AudioRoute installs a virtual input device — “AudioRoute Input” — that shows up in GarageBand's input picker just like an audio interface. Point GarageBand at it and record; no aggregate device or Audio MIDI Setup.
- In GarageBand → Settings → Audio/MIDI, set the Input Device to AudioRoute Input.
- Add an Audio track and set its input to 1-2 (AudioRoute Input) in the Smart Controls Recording Settings.
- Record-enable the track, press global Record, and play your source — leave Input Monitoring off to avoid feedback.
Prefer to capture and drag it in? This guide covers the live-to-track flow. If you'd rather record the audio and drag the finished clip straight onto a track, the drag-and-drop workflow works the same in every DAW.
Why this is hard in GarageBand by default
GarageBand happily records from any Core Audio input device, but macOS doesn't expose "system output" as an input. If you want to capture a Zoom call, a YouTube tab, a browser radio stream, or the mix from another music app, you need a virtual input device that macOS treats like real hardware. Historically that meant BlackHole plus an aggregate device in Audio MIDI Setup — workable, but it hijacks your output routing and the setup has to be rebuilt every time you swap between speakers and headphones.
AudioRoute installs a virtual input called AudioRoute Input. It's a normal Core Audio device: GarageBand sees it in the Input Device menu, treats it as a two-channel source, and records from it exactly like a USB interface. Your real output (speakers, headphones, interface) keeps working untouched — AudioRoute quietly siphons a parallel copy of whatever the system is already playing. More on how that works if you're curious.
What you'll need
- macOS 14.2 (Sonoma) or later — AudioRoute requires the CoreAudio process tap APIs Apple shipped in macOS 14.
- GarageBand 10.4 or later — this guide was written with GarageBand 10.4.13, the workflow is the same on any recent version.
- AudioRoute 0.2.0 or later — the free 14-day trial covers the whole workflow. €39 lifetime license after that, all future updates included.
Once AudioRoute is installed (drop in the signed .pkg, enter your admin password once, done), the AudioRoute icon shows up in your menu bar and macOS registers a new input device called AudioRoute Input. GarageBand will pick it up on its next launch — if it was already open when you installed AR, just quit and reopen.
Step 1
Set GarageBand's Input Device to AudioRoute Input
Open GarageBand and go to GarageBand → Settings → Audio/MIDI (older versions may call this menu "Preferences"). Under Devices, click the Input Device dropdown and pick AudioRoute Input.
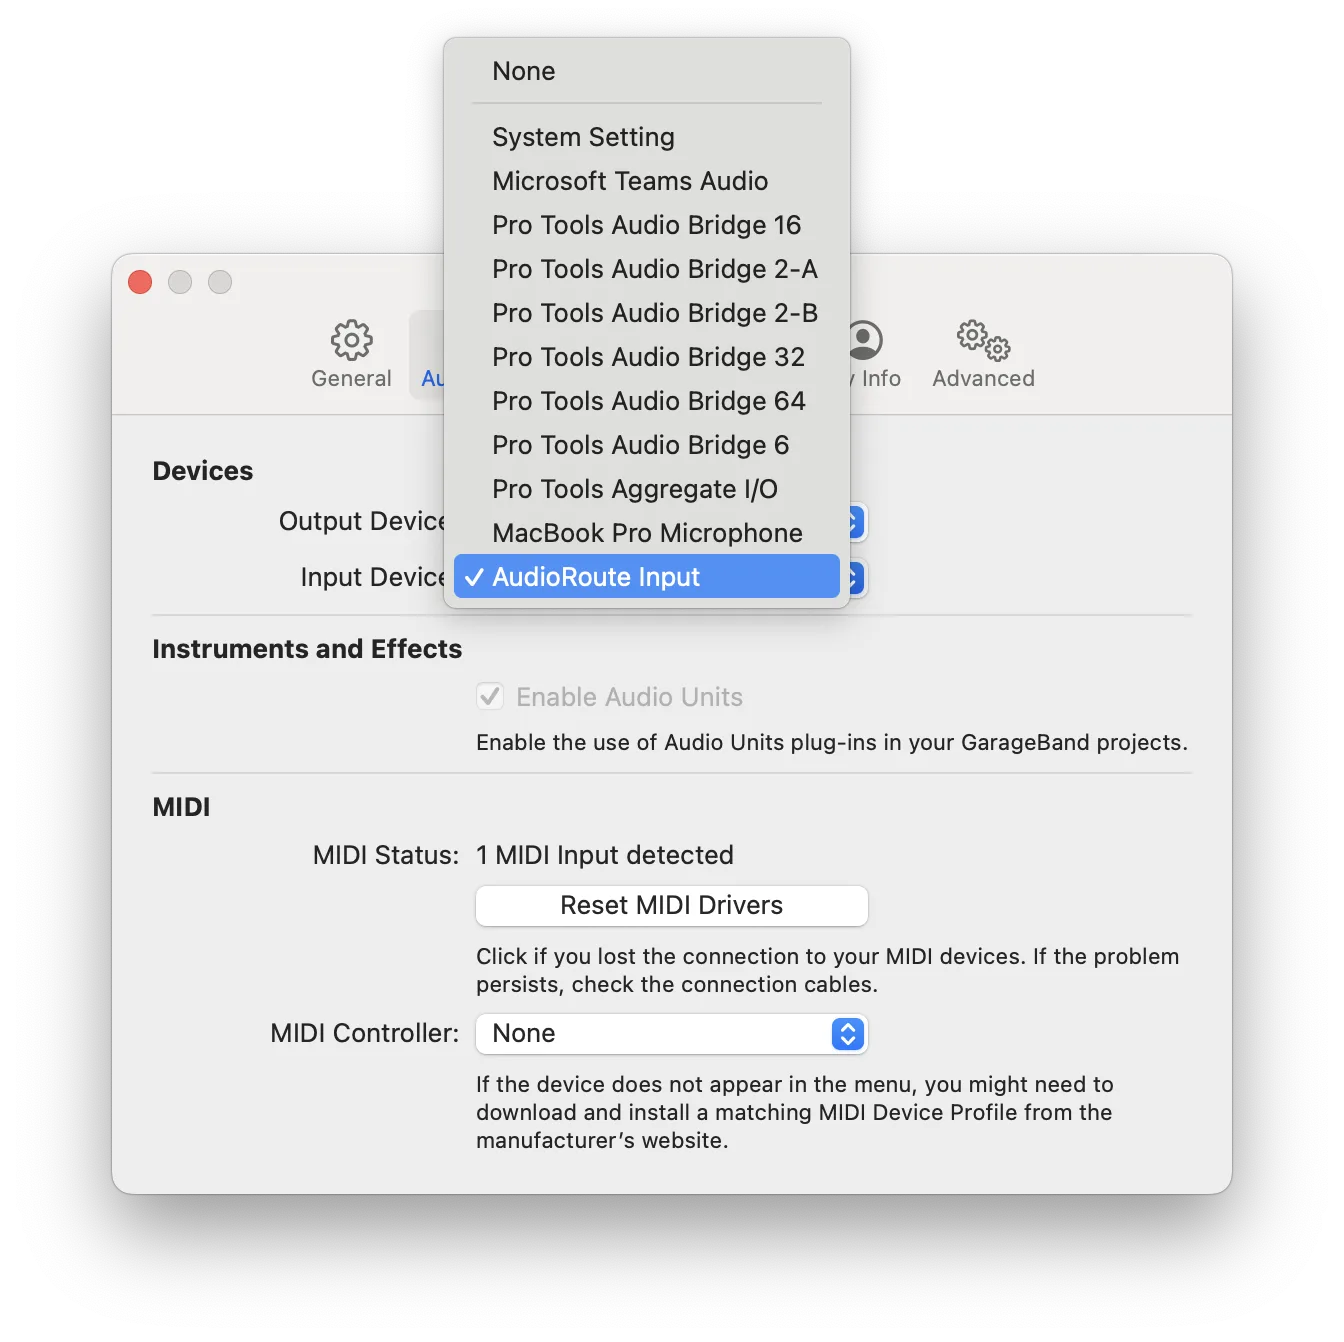
Leave Output Device alone — AudioRoute does not need to touch it. Your speakers or headphones stay wired to whatever they were before.
Don't see AudioRoute Input in the list? Confirm the AudioRoute icon is visible in your menu bar (that means the daemon is running and the HAL driver is registered). If it isn't, launch AudioRoute from Applications, then reopen the GarageBand settings pane so it re-scans devices.
Step 2
Add an Audio track and set its input
Add an Audio track if the project doesn't have one already (Track → New Track → Audio → Microphone, or Cmd+Option+N). Select the track, then open the Smart Controls panel (B toggles it).
Under Recording Settings → Input, click the Input dropdown and pick 1-2 (AudioRoute Input). That routes the AR virtual device's stereo pair into the track. Nothing else on this panel needs changing.
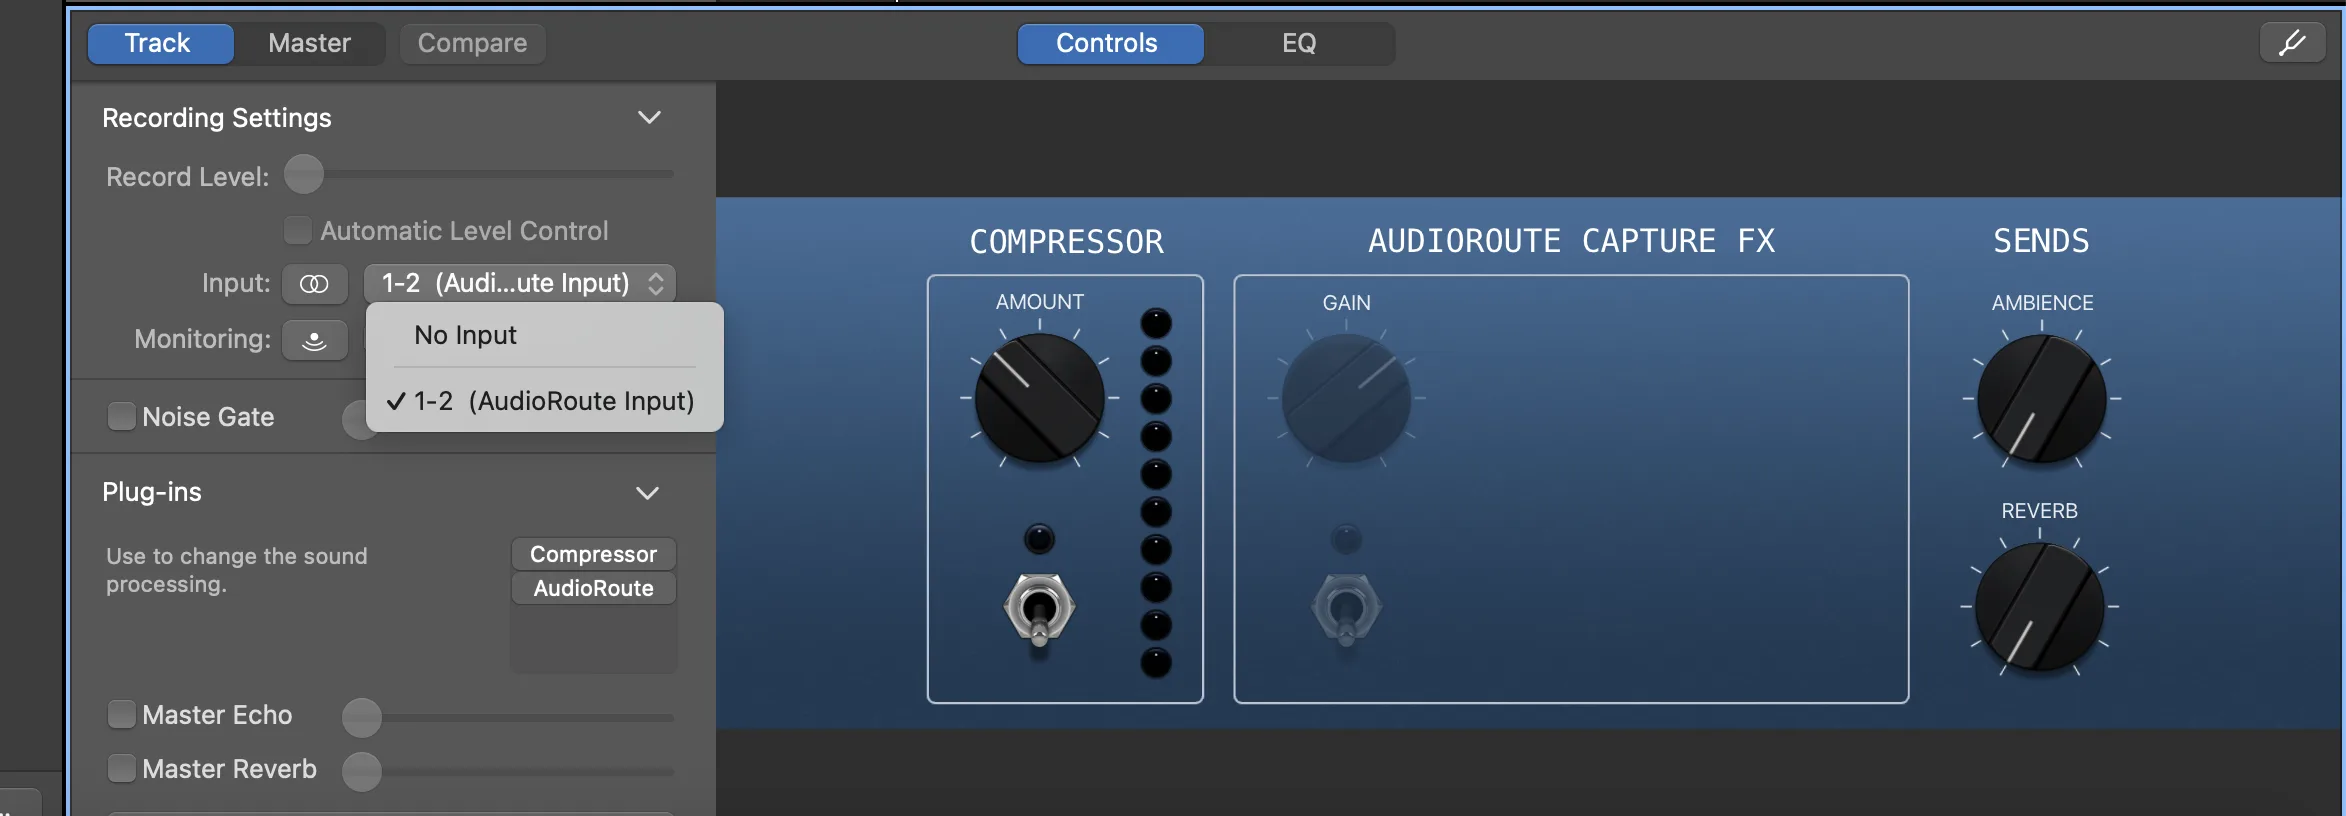
Turn Monitoring off for now. The little speaker icon next to Input is Input Monitoring. Leave it disabled — if it's on and your system output is on speakers rather than headphones, you'll create a feedback loop (speakers → AR captures → GB plays it back through speakers → AR captures again…). Recording still works fine with monitoring off; you just won't hear the captured signal in real time. See gotchas below if you want live monitoring.
Step 3
Arm the track and record
Click the Record Enable button on the track header (the small red-outlined circle), then start whatever source you want to record — a YouTube tab, Spotify, a Zoom call, another app's output. GarageBand's own level meter on the track header should start moving as soon as audio is playing.
When you're ready, hit the global Record button in the transport (or press R). GarageBand starts writing the incoming audio to a region on the track. Stop the transport when you're done.
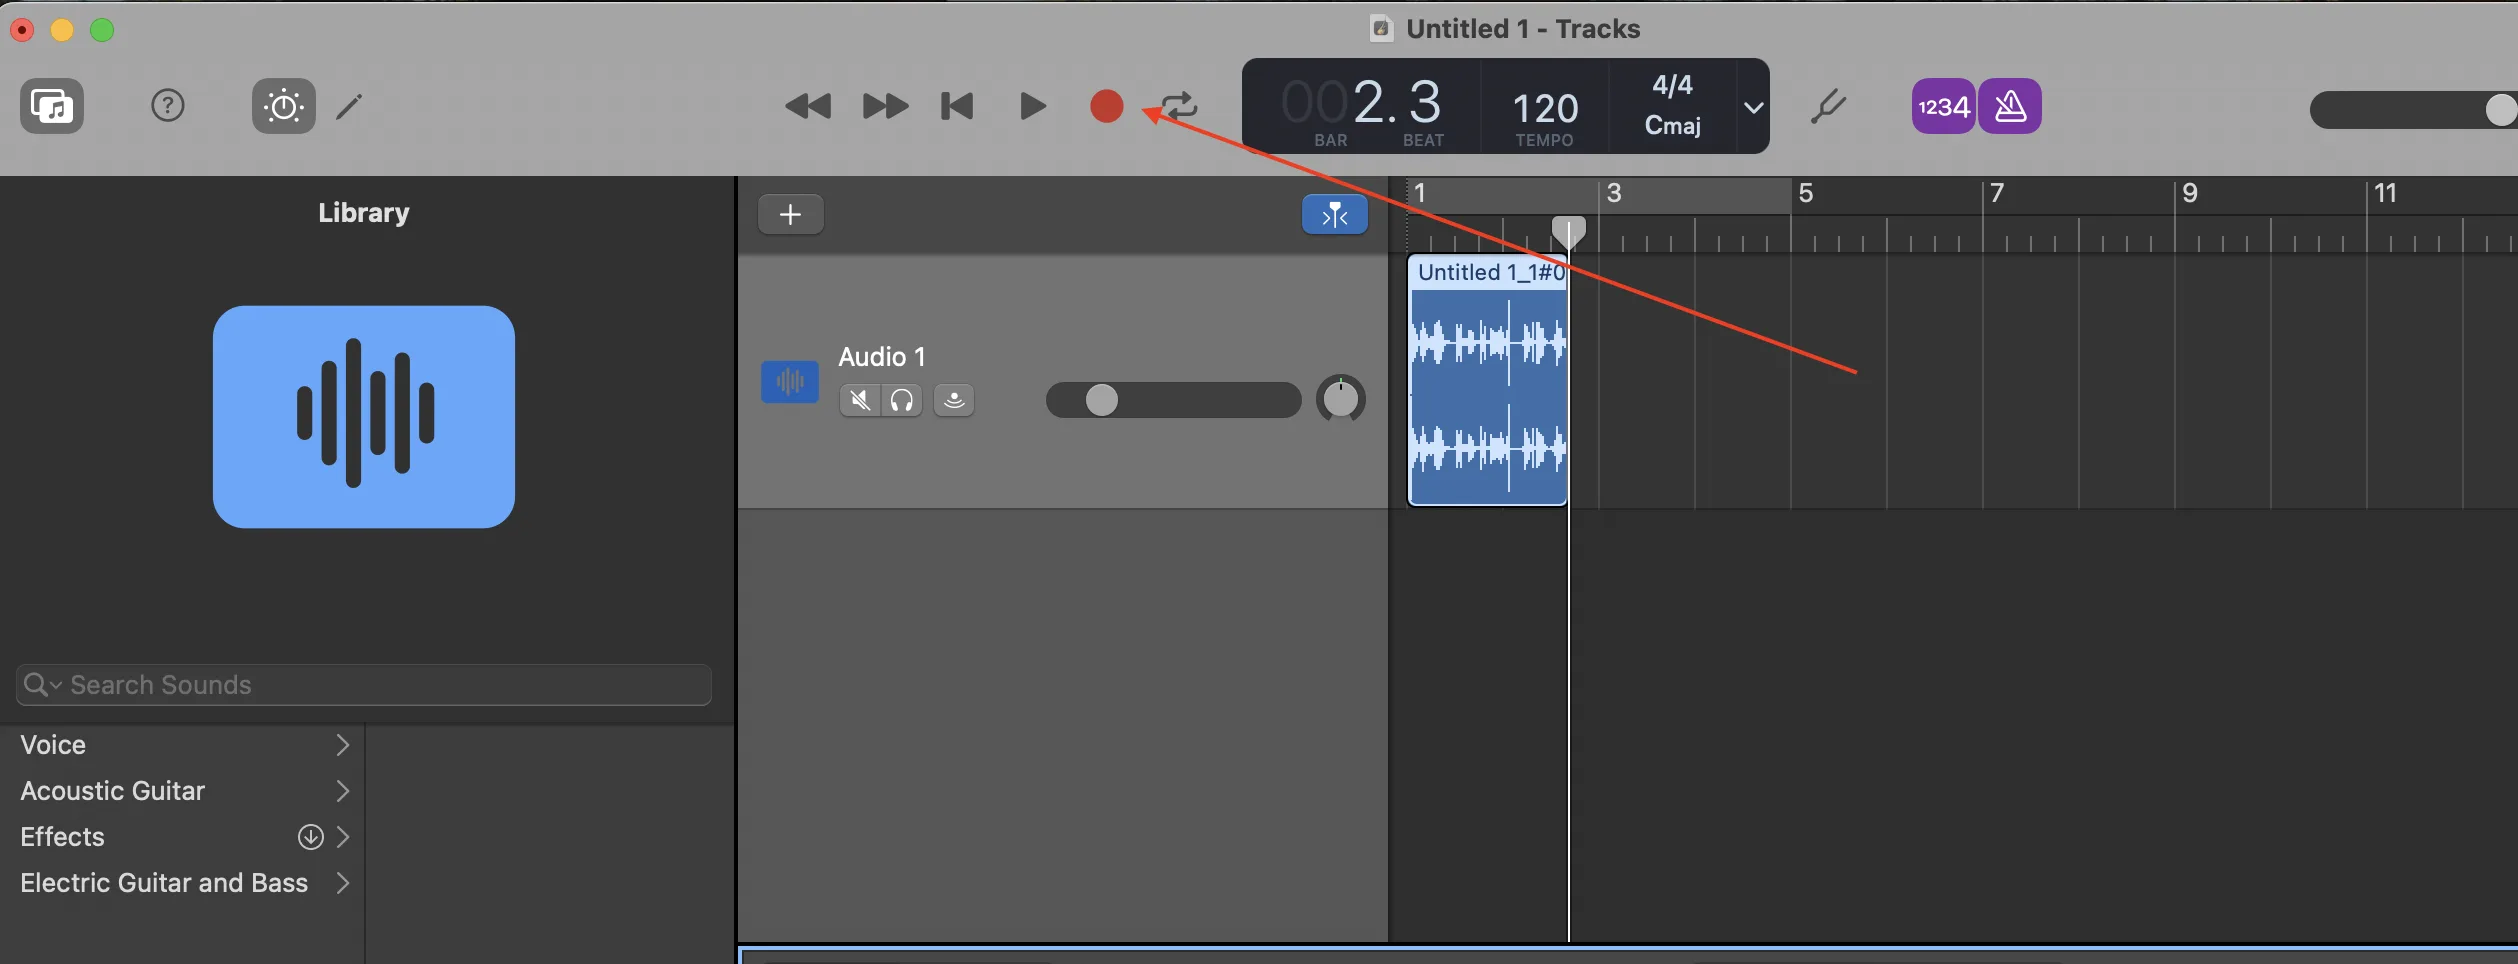
That's the whole workflow. The next time you open GarageBand for a system-audio capture, the Input Device is remembered globally, so it's just: new track → set input to 1-2 (AudioRoute Input) → record.
Common gotchas
Silent recording (flat waveform)
The track records but the waveform is a flat line. Almost always one of three things:
- The AudioRoute daemon isn't running. The AR icon must be visible in your menu bar for the virtual device to deliver audio. If you're on the default always-on mode, just launch AudioRoute from Applications. If you switched to On-Demand mode, click the AR menu bar icon and pick Start Daemon before opening GarageBand.
- Nothing actually playing through system output. AudioRoute captures whatever is being sent to your Mac's current output device. If your Mac's output is muted or nothing is playing, there's nothing to capture. Play a YouTube tab and watch GarageBand's own track meter — if it moves, capture is live.
- Input set to a single channel instead of the stereo pair. Make sure the track's Input is 1-2 (AudioRoute Input), not just channel 1. GarageBand will record a mono take from channel 1 alone, which is fine for mono sources but will drop half the stereo content otherwise.
Feedback loop when Input Monitoring is on
Enabling Input Monitoring routes the captured audio back out through your Mac's output. If that output is on speakers rather than headphones, AudioRoute re-captures it, and the loop compounds until it clips. Two fixes:
- Wear headphones. Simplest fix — the loop needs an acoustic path between the speakers and the AR capture; headphones break it.
- Leave monitoring off during the take. You lose real-time monitoring, but the recording is unaffected. Play the region back after stopping to review.
GarageBand only recorded one channel
GarageBand's default Audio track is mono. When you create a new Audio track, expand the New Track sheet's Details section and pick Input 1 + 2 (Stereo) before clicking Create. If you already have a mono track, delete it and add a stereo one; GarageBand doesn't let you change a track's mono/stereo state after creation.
"I want to record my microphone AND system audio into the same session"
GarageBand uses one Input Device system-wide, so you can't have the built-in mic and AudioRoute active simultaneously on separate tracks. Two options:
- Create an Aggregate Device in Audio MIDI Setup that combines AudioRoute Input with your microphone (built-in or interface). Point GarageBand at the aggregate device, then in the Smart Controls Input picker you'll see channels for both. Route your mic track to the mic's channels and your capture track to AudioRoute Input's 1-2 pair.
- Use a "real" DAW. Logic Pro, Ableton Live, or Reaper let you record from your microphone and AudioRoute on separate tracks at the same time without needing an aggregate device. See the Logic Pro guide or Ableton guide for that flow.
Shortcut: skip GarageBand, capture straight to WAV
If your goal is just "I need a WAV of what's playing on my Mac" and you don't need DAW editing, AudioRoute can do that directly from the menu bar app. No GarageBand project, no track wiring, no DAW at all.
Click the AudioRoute icon in your menu bar → Start Recording. It writes to ~/Documents/AudioRoute Recordings/ (configurable in preferences) at your chosen sample rate and bit depth. Click Stop Recording when done. Drop the file into GarageBand later if you decide you want to edit it, or straight into any other app that opens a WAV.
Related guides
- Capture audio and drag it into any DAW — the universal drag-and-drop workflow.
- Record system audio on Mac (no DAW required) — the simpler workflow when you don't need a DAW in the loop.
- Record system audio in Logic Pro — the Logic Pro flow with bus routing.
- Record system audio in Ableton Live — Live-specific routing.
- Record system audio in Reaper — cross-platform DAW workflow.
- AudioRoute vs BlackHole — honest comparison and 5-minute migration.
Try AudioRoute on your next session
Free 14-day trial, no credit card. €39 lifetime license, all future updates included.
Download AudioRoute View pricing