Home / Guides / Record system audio in Reaper
How to Record System Audio in Reaper
Reaper doesn't ship with a built-in way to record system audio — whatever's playing through Spotify, YouTube, Zoom, your browser, or any other app — into a project. This guide walks through the workflow using AudioRoute. As of v0.2.0 there are two flavours of the AudioRoute plug-in (Audio Effect and Instrument); pick the one that matches your starting point and follow that section linearly. Reaper is the friendliest DAW in the lineup for this workflow because both flavours record on a single track. No aggregate device, no virtual driver wiring, no Audio MIDI Setup. Works on both Mac and Windows.
Why this is hard by default
Reaper can record audio from any input device — an audio interface, a USB microphone, a built-in mic. But "system audio" isn't a single device. Your OS routes whatever's playing through whatever output you've selected (built-in speakers, headphones, audio interface, AirPlay), and there's no built-in "system output as input" device to pick.
The conventional workarounds all treat system audio as a routing problem — they install a virtual audio device that pretends to be a speaker, then you redirect your system output to it. On Mac that means BlackHole + an aggregate device in Audio MIDI Setup so you can still hear what's being routed. On Windows it's VB-Cable or VoiceMeeter with similar manual wiring. Both work, but they hijack your output routing and break the moment you change devices.
AudioRoute takes a different approach. Instead of rerouting your output through a virtual device, it quietly observes whatever your system is already playing. Your speakers, headphones, or audio interface keep working exactly as they did, and AudioRoute simply gets a parallel copy of the audio to deliver into Reaper. No aggregate device, no rerouting, no driver tweaking. More on how it works under the hood if you're curious.
Reaper is one of the friendlier DAWs for this workflow because it doesn't filter plugins by AU/VST type the way some hosts do — AudioRoute Capture shows up in the standard VST3 instrument list and goes on any track you like. The whole flow is six clicks.
Two ways to load AudioRoute — which to pick
AudioRoute 0.2.0 ships the capture plug-in in two flavours. They share the same daemon underneath and produce identical capture; in Reaper, both record on a single track via Record: output (Post-FX) mode. The difference is purely which category the plug-in appears under in the Add FX picker:
| If you… | Use | Where it lives in Reaper |
|---|---|---|
| Are setting up a new session | AudioRoute Capture FX (Audio Effect) | Add FX picker → under AU or VST3 (the standard effect categories). Recommended path going forward. |
| Are opening a session that already had AudioRoute loaded before 0.2.0 | AudioRoute Capture (Instrument) | Add FX picker → under AUi or VST3i (the instrument categories). The original variant, byte-identical plug-in ID, so old sessions auto-load it. |
Both produce the same recording. Pick a section and follow it linearly — the two flows don't interleave.
What you'll need
- macOS 14.2 (Sonoma) or later, or Windows 10 (build 20348) or later.
- Reaper 6.x or later — this guide was written using Reaper 7.73 on macOS, but the workflow is identical on Windows and on older versions.
- AudioRoute 0.2.0 or later — the free 14-day trial covers the whole workflow. €29 lifetime license. On 0.1.x the FX variant won't appear in the Add FX picker — update first.
Once AudioRoute is installed, Reaper will pick up both AudioRoute Capture FX (Effect) and AudioRoute Capture (Instrument) on its next plugin scan. If neither appears, force a rescan in Reaper → Settings → Plug-ins → VST → Re-scan.
Section A — Using AudioRoute Capture FX (Audio Effect)
Reaper's Record: output mode means the Effect variant records on a single track — no second track, no Group routing. The FX plug-in sits on the track, Reaper captures the post-FX signal directly. This is the cleanest of any DAW in our guides.
Step 1
Add a track and open its FX chain
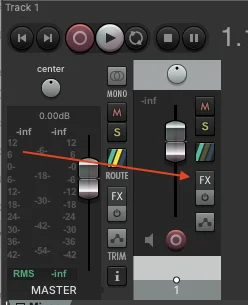
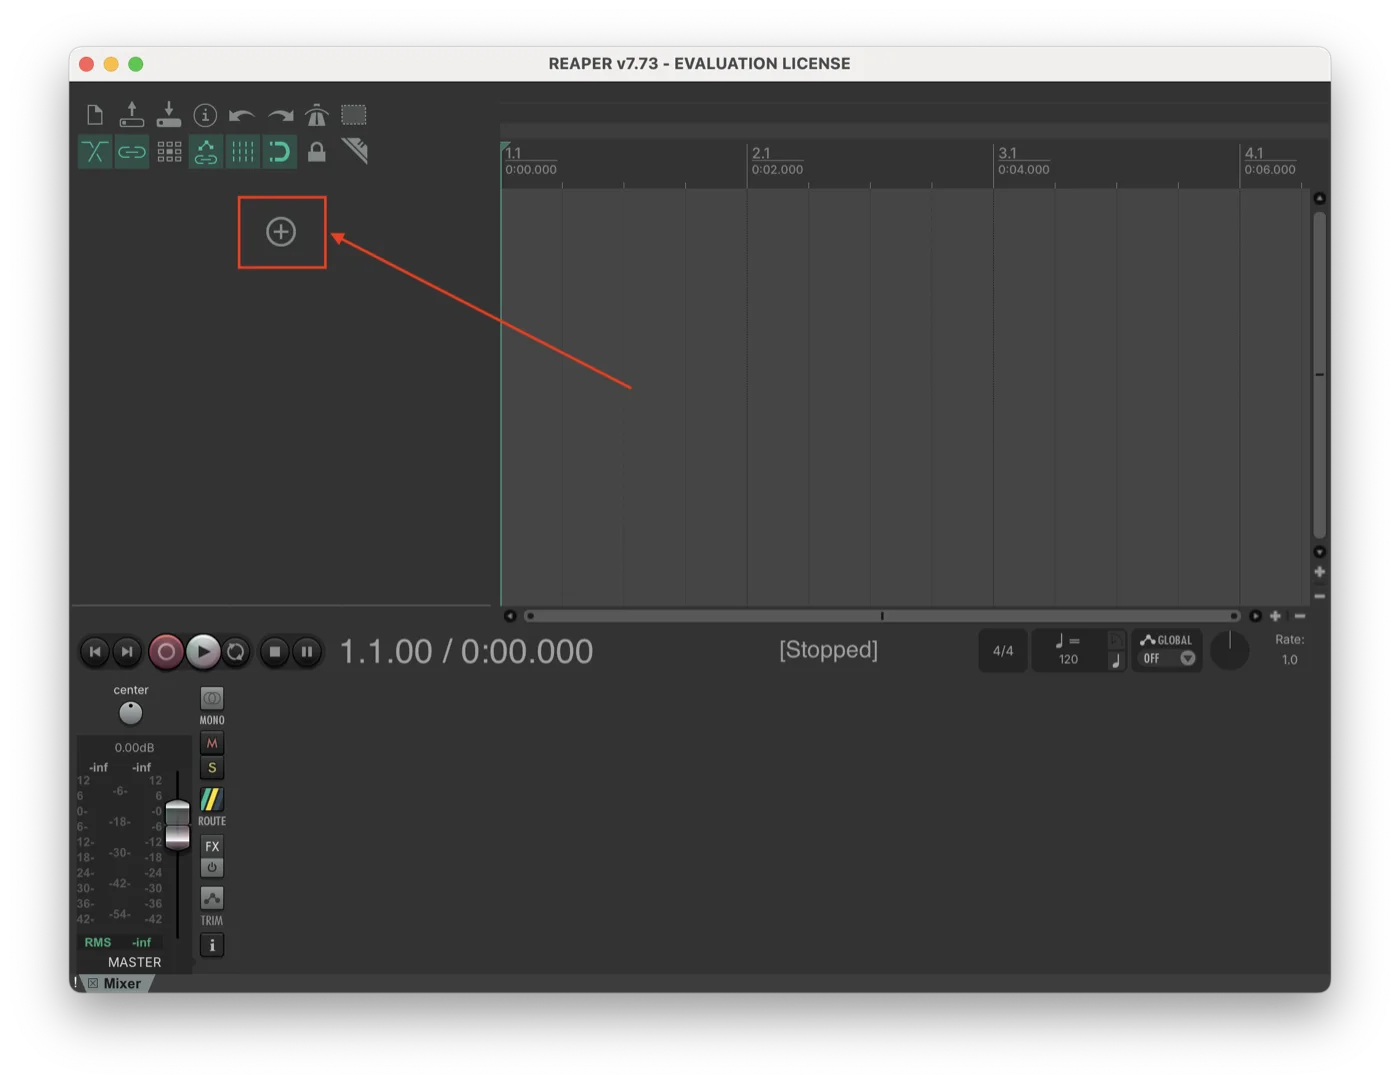
Open your Reaper project, or start a new one. Click the + button at the top of the track list (or Cmd/Ctrl+T). An empty track appears.
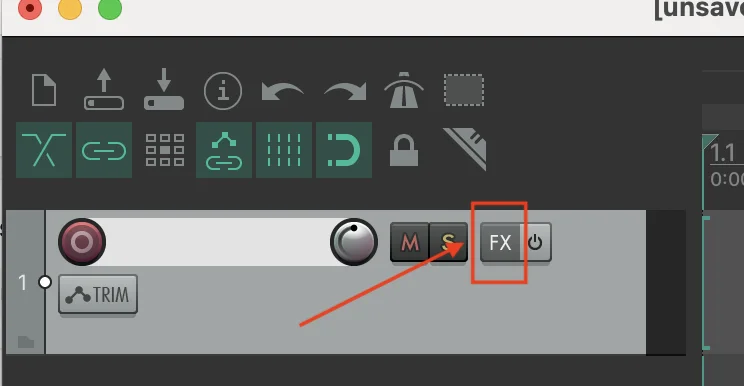
On the new track header, click the FX button (small grey button to the right of the M and S buttons). The Add FX dialog opens.
Step 2
Add AudioRoute Capture FX
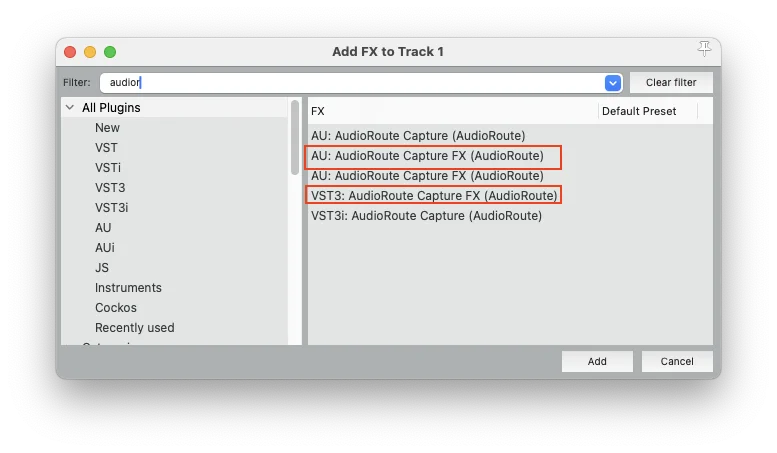
In the Add FX to Track 1 filter box, type audio. Five AudioRoute entries appear. Pick either:
- AU: AudioRoute Capture FX (AudioRoute) — macOS Audio Unit Effect
- VST3: AudioRoute Capture FX (AudioRoute) — VST3 Effect (Mac or Windows)
Click Add. The plug-in window opens.
Step 3
Enable Output to DAW
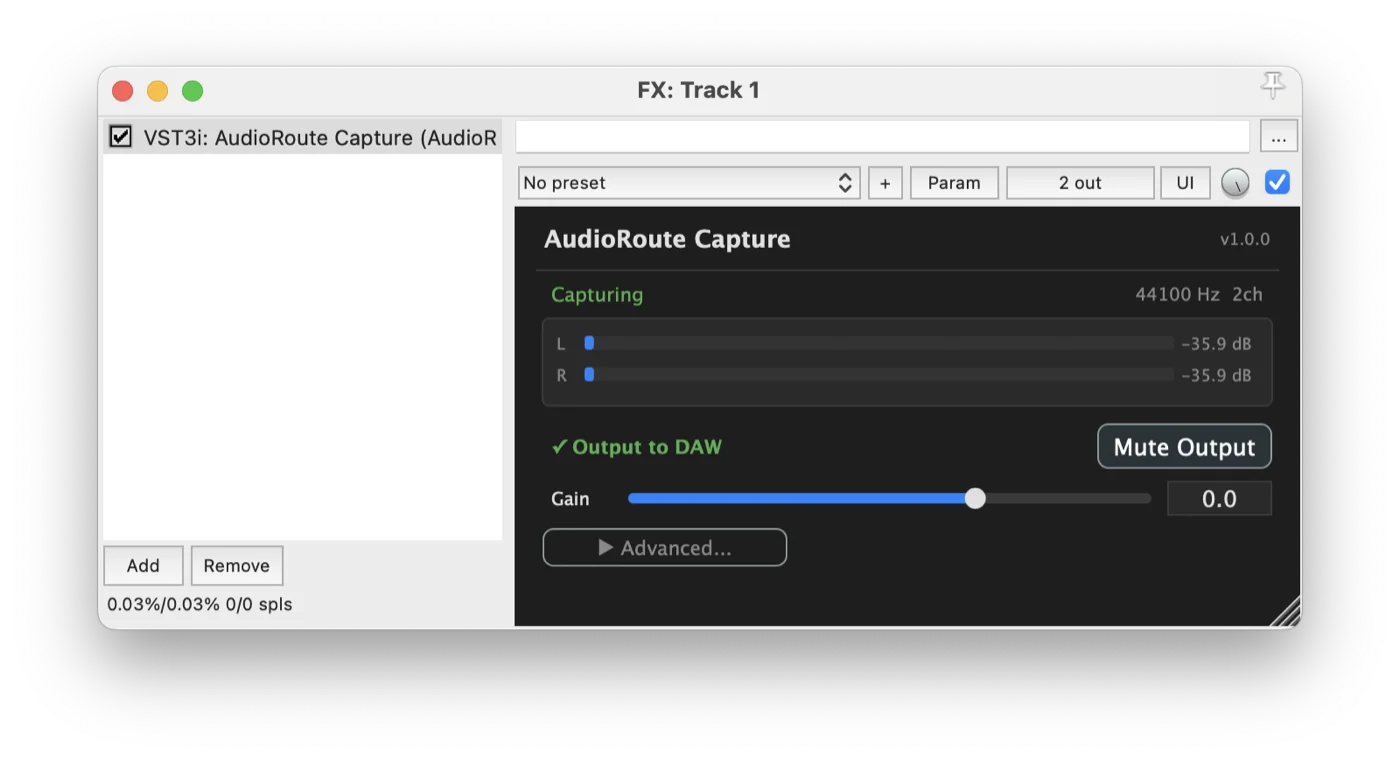
The AudioRoute Capture FX plug-in window opens. The first time you load any AudioRoute plug-in, you'll see an "⚠ Output to DAW is muted" warning with a big blue Enable Output to DAW button. This is intentional — the plug-in starts in a safe state so it can't accidentally create a feedback loop before your routing is set up. The meters above are already moving, which confirms the daemon is capturing system audio; it's just not yet being passed through to the DAW track.
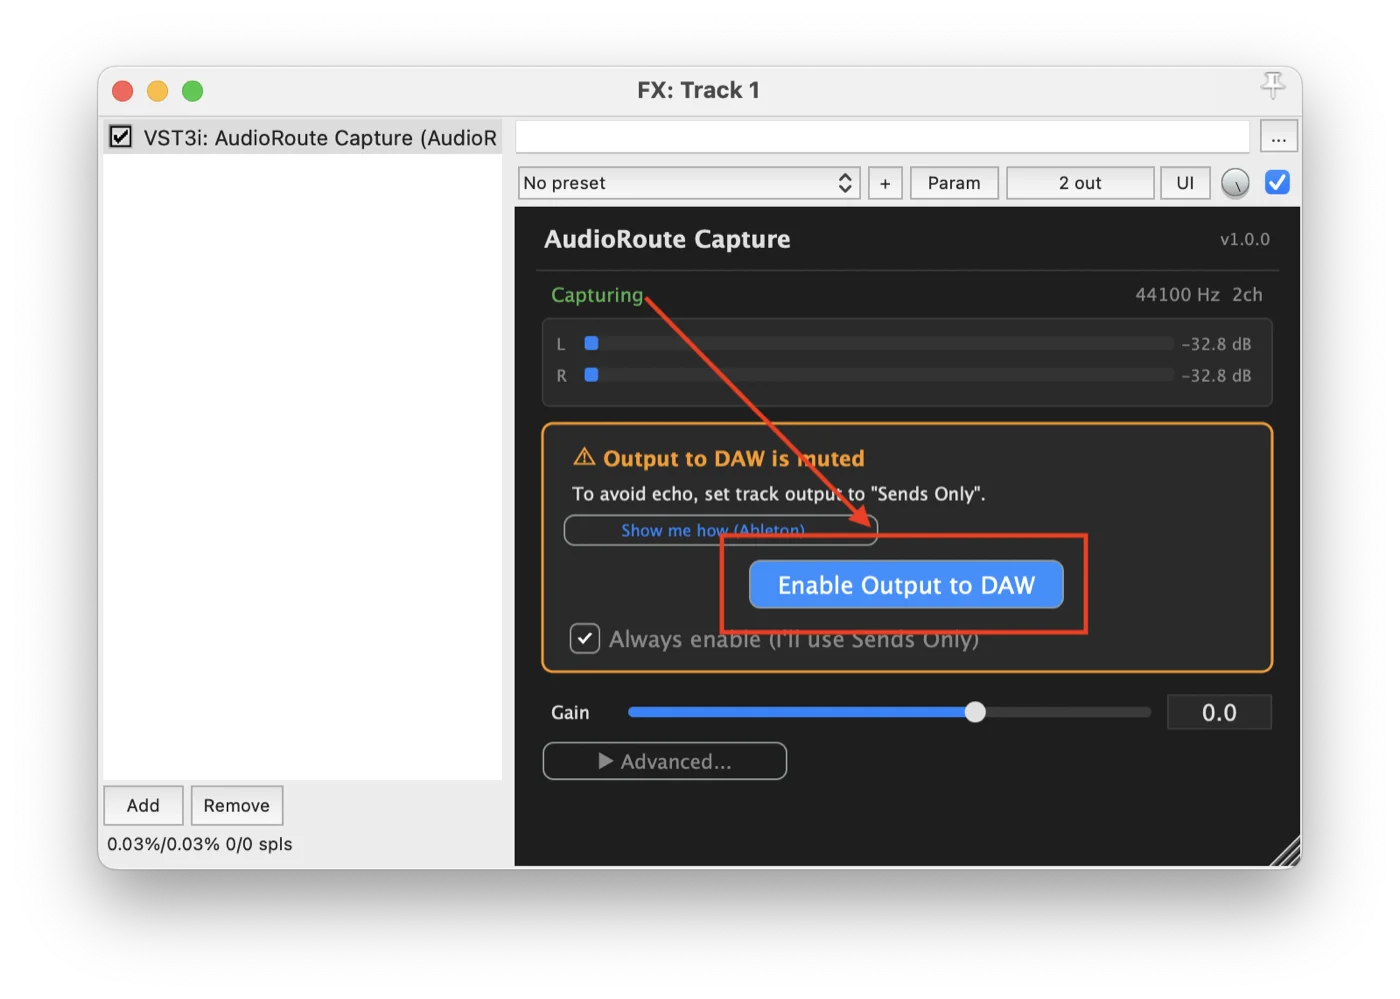
Click Enable Output to DAW. The warning disappears, the status flips to a green ✓ Output to DAW, and the plug-in starts sending captured audio into the track.
Step 4
Set the track to Record: output (Post-FX)
This is the key Reaper-specific step. By default Reaper records a track's input, not its FX-chain output. We want to record what AudioRoute Capture FX is producing, so we need to switch the track's record mode.
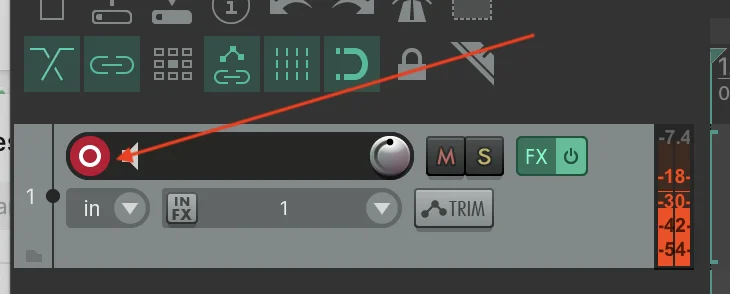
On the track header, find the small input/source dropdown directly below the record-arm circle. It reads "in" by default — meaning the track is currently in Record: input mode. Click that dropdown (left-click, not right-click).
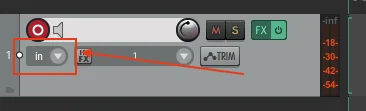
A menu opens. From it:
- Choose Record: output → the submenu opens.
- Pick Record: output (stereo).
- Make sure Output mode: Pre-Fader (Post-FX) is ticked — this is what makes Reaper capture the signal after the FX chain processes it. Reaper usually defaults to this, but it's worth verifying.
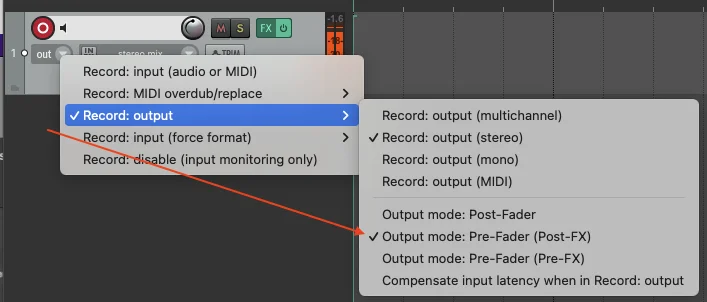
The dropdown label flips from "in" to "out" as confirmation that record mode actually switched. If the label didn't change, the mode didn't apply — see the troubleshooting note below.
Custom UI themes / modified Reaper layouts — the "in" dropdown's name and behaviour can differ depending on which theme or layout you use. One reported case (third-party-modified GUI on Windows): the dropdown was labeled "Device In", and the standard right-click-on-record-arm path produced the same menu but didn't actually apply the change — submenu items looked ticked but record mode stayed in input. Right-clicking the "Device In" dropdown itself fixed it; the label then flipped to "Track Out". If neither path works on your setup, look for the input/source dropdown by its content label (the audio input it currently shows) rather than its position; that's the element you want to click.
Why this matters here and not in Logic/Cubase. Logic and Cubase don't expose a "record the FX chain output" toggle — their recording engines always capture the dry input, which is why those guides need a second track to receive the post-FX signal via a Bus/Group. Reaper's Record: output mode is exactly the feature that makes the single-track flow possible.
Step 5
Arm and record
Close the FX window. Click the red record-arm circle on the track header — it lights up red and the track meter starts following the audio flowing through AudioRoute Capture FX.
Press the global Record button in Reaper's transport (or Cmd/Ctrl+R). The captured audio is recorded onto the track as a normal audio item.

That's the Effect-flavour setup — five steps, single track. Save as a Reaper template and the next session is one open + one record arm.
Section B — Using AudioRoute Capture (Instrument, for existing sessions)
This is the original AudioRoute Capture plug-in (the Instrument flavour, appearing as VST3i/AUi in Reaper's FX picker). Use it if you have a session that loaded AudioRoute before 0.2.0 — it will auto-load with the same plug-in identifier and your existing routing stays intact. For new sessions, prefer Section A above.
Step 1
Add a new track
Open your Reaper project, or start a new one. Click the + button at the top of the track list (or use Track menu → Insert new track, shortcut Cmd/Ctrl+T). An empty track appears.
Step 2
Open the track's FX chain
On the new track's header, find the FX button (small grey button just to the right of the Mute/Solo buttons). Click it.
Step 3
Add AudioRoute Capture
The Add FX to Track 1 dialog opens. In the filter box at the top, type audio — the list narrows to AudioRoute entries. Click VST3i: AudioRoute Capture (AudioRoute), then click Add.

If it's not in the list, your VST3 scan probably hasn't picked it up yet. Go to Reaper → Settings → Plug-ins → VST and click Re-scan, then reopen the Add FX dialog.
Step 4
Enable Output to DAW
The AudioRoute Capture plugin window opens. The first time you load it, you'll see an "⚠ Output to DAW is muted" warning with a big blue Enable Output to DAW button. This is intentional — the plugin starts in a safe state on first launch so it can't accidentally create a feedback loop before you've finished setting up your routing. The meters above are already moving, which confirms the daemon is capturing system audio; it's just not yet being passed through to the DAW track.
Click Enable Output to DAW. The warning disappears, the status flips to a green ✓ Output to DAW, and the plugin starts sending captured audio into the track.
You'll also see a checkbox labeled "Always enable (I'll use Sends Only)". Leave it unticked for now — tick it later only once you've set up Sends Only routing (covered in Common gotchas below). It's there to bypass the safety mute on future loads, which only makes sense after you've eliminated the feedback path the safety mute exists to prevent.
Meters flat? Check the AudioRoute icon is present in your menu bar (macOS) or system tray (Windows) — that indicates the daemon is running. Also confirm something is actually playing through your system output; if it's muted, AudioRoute has nothing to capture.
Step 5
Arm the track for recording
Close the FX window. On the track header, click the red record-arm circle (left side of the track controls). It lights up red when armed, and the track meter starts following the audio flowing through AudioRoute Capture.
Step 6
Hit global Record
Press the global Record button in the Reaper transport (large red circle, top-centre), or use the shortcut Cmd/Ctrl+R. The captured audio is recorded onto the armed track as a normal audio item — the same kind of item you'd get from recording a microphone or audio interface input. Edit it, glue it, render it, drop it into any project.
![Reaper transport bar with the global Record button highlighted, and 'Track 1 [FX] 1 (AudioRoute Capture)' shown above as the active track](/screenshots/guides/reaper/07-global-record.webp)
That's the whole setup. The first time it feels like a lot of clicks; every project after that takes about ten seconds because the AudioRoute plugin and the routing both persist in saved Reaper templates.
Common gotchas
Recorded file is silent even though meters were moving
By default Reaper records the track's input, not its FX output. If your record-armed track has its input set to a real audio interface (or no input at all) and you forgot to switch it, the recording will be silent regardless of what the AudioRoute plugin is doing.
Fix: right-click the track's record-arm button and choose Record: output → Record: output (stereo). The track will now record whatever the FX chain outputs — which is exactly what we want here. (Reaper sometimes sets this automatically when you add an instrument FX; this gotcha exists for the case where it doesn't.)
Feedback loops during recording
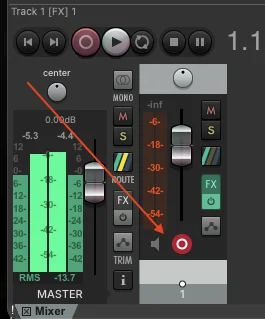
If you hear a feedback howl or runaway oscillation while recording, here's what's happening: the captured audio is being played back through your output (speakers or headphones), AudioRoute picks it up again, and the signal loops.
The cleanest fix is to stop sending the captured signal to your output at all. On the track holding AudioRoute Capture, click the small speaker icon next to the record-arm to toggle monitor off — the track still records, but it no longer plays back through your master out, so AudioRoute can't pick its own signal up again.
As an alternative, if the routing tweak feels fiddly, wear headphones during recording. Less surgical but often quick enough to get a clean take.
What does the "Mute Output" button in the plugin do?
The Mute Output toggle inside the AudioRoute Capture plugin window stops the plugin from sending audio to the DAW entirely. It exists for scenarios where you only want to use AudioRoute's standalone tray recorder (or its virtual input device, on macOS) and don't need the DAW path active.
Leave Mute Output OFF when recording into Reaper. If it's on, the track will record silence — the plugin isn't passing audio through. The status line should be a green ✓ Output to DAW, not muted.
My recording sounds quiet (or too loud)
The plugin passes audio through at unity gain by default. Check the Gain slider in the plugin window — it should be at 0.0 dB unless you've adjusted it. The L/R meter levels you see in the plugin are exactly what'll be written to disk on the track. If you need to attenuate or boost, do it with the Gain slider in the plugin (before recording) or as a fader move on the track during playback.
Shortcut: skip Reaper, capture straight to WAV
If your goal is just "I need a WAV file of what's playing on my system" and you don't need DAW editing, AudioRoute can do that directly from the tray app. No Reaper project, no FX chain, no record-arming.
Click the AudioRoute icon in your menu bar (macOS) or system tray (Windows) → Start Recording. It captures to ~/Music/AudioRoute/ by default (configurable in preferences) at your chosen sample rate and bit depth. Click Stop Recording when done. The file is ready to drop into anything that opens a WAV.
Same plugin under the hood, zero DAW setup. Useful for quick one-offs — capturing a snippet of a lecture, grabbing a sample from YouTube, recording a Zoom call without setting up a session.
Related guides
- Record system audio on Mac (no DAW required) — the simpler workflow when you don't need Reaper in the loop.
- Record system audio on Windows (no DAW required) — same simple workflow, Windows version.
- Record system audio in Logic Pro — Mac-only DAW alternative.
- Record system audio in Ableton Live — same idea, Live-specific routing.
- Record system audio in Cubase — the Cubase Pro / Artist routing version.
- Record system audio in GarageBand — free-DAW alternative on Mac.
- AudioRoute vs BlackHole — honest comparison and 5-minute migration.
Try AudioRoute on your next Reaper session
Free 14-day trial, no credit card. €29 lifetime license, all future updates included.
Download free trial View pricing