Home / Guides / Record system audio in Cubase
How to Record System Audio in Cubase
Cubase doesn't ship with a built-in way to record system audio — the sound coming out of Spotify, YouTube, Zoom, your browser, or any other app — onto an audio track in your project. This guide walks through the workflow using AudioRoute. As of v0.2.0 there are two flavours of the AudioRoute plug-in (Audio Effect and Instrument); pick the one that matches your starting point and follow that section linearly. No aggregate device, no virtual driver, no Studio Setup gymnastics.
- Why this is harder than it should be in Cubase
- Two ways to load AudioRoute — which to pick
- What you'll need
- Match the sample rates first (this matters)
- Section A — AudioRoute Capture FX (Audio Effect, recommended)
- Section B — AudioRoute Capture (Instrument, for existing sessions)
- Common gotchas
- Shortcut: skip Cubase, capture straight to WAV
Why this is harder than it should be in Cubase
Cubase's design assumes audio tracks record from physical inputs — a microphone, a line-in, an audio interface channel. Internal routing from an instrument's audio output to an audio track's input isn't first-class in Cubase the way it is in Logic Pro or Ableton Live. Render in Place doesn't help here either, because it runs offline (faster than real-time) and AudioRoute's source is the live system audio tap that can only produce audio at real-time speed.
The pattern that does work cleanly is to stage the AudioRoute Capture plugin on an Instrument Track, route its audio output through a Group Track (with the Group's own output set to No Bus to prevent feedback), and have a separate Audio Track tap that Group as its input source for recording. Cubase's Audio Track input from a Group taps the signal before the Group's output stage, so the "No Bus" doesn't block recording — it just prevents the audio from playing back out the speakers, which is exactly what stops the feedback loop.
It's one more step than the equivalent setup in Logic or Live, but once the topology is in place it's the same workflow every time. More on how AudioRoute works under the hood if you're curious.
Two ways to load AudioRoute — which to pick
AudioRoute 0.2.0 ships the capture plug-in in two flavours. They share the same daemon underneath and produce identical capture; the difference is purely where in Cubase's UI you load each one and which track type it lives on:
| If you… | Use | Where it lives in Cubase |
|---|---|---|
| Are setting up a new session | AudioRoute Capture FX (Audio Effect, VST3) | Audio Track Inserts → Other → AudioRoute Capture FX. Recommended path going forward. |
| Are opening a session that already had AudioRoute loaded before 0.2.0 | AudioRoute Capture (Instrument, VST3) | Instrument Track → Instrument dropdown → AudioRoute Capture. The original variant, byte-identical plug-in ID, so old sessions auto-load it. |
Both flavours end up with the same three-track topology in Cubase (the source track + a Group + the recording Audio Track) because Cubase's recording engine doesn't capture the post-effects signal on the source track itself — the Group exists to give the recording track a clean tap point. The Effect variant is preferred because it lives on a regular Audio Track in the standard Inserts list, which is where most engineers will instinctively look for a "process this track" plug-in.
Pick a section and follow it linearly — the two flows don't interleave.
What you'll need
- Cubase Pro / Artist / Elements 12 or later — this guide was written on Cubase Pro 15, but the routing pattern works on any version with Group Tracks.
- macOS 14.2+ or Windows 10/11 — AudioRoute uses Core Audio process taps on Mac (macOS 14.2+) and WASAPI process loopback on Windows (Win 10 1903+).
- AudioRoute 0.2.0 or later — the free 14-day trial covers the whole workflow. €29 lifetime license, both platforms. The 0.2.0 release ships both plug-in flavours; on 0.1.x the Effect variant won't appear in the Inserts list — update first.
Install AudioRoute, then quit and reopen Cubase so its plugin scanner picks up both AudioRoute Capture FX (under Inserts → Other) and AudioRoute Capture (in the Instrument dropdown when adding an Instrument Track).
Match the sample rates first (this matters)
Before you touch anything in Cubase, make sure three rates agree:
- Your audio output device's rate — on Mac, set this in Audio MIDI Setup by selecting your output device on the left and choosing the Format on the right. On Windows, Sound Settings → Properties → Advanced → Default Format.
- AudioRoute's recording rate — the tray app's Rec Rate should be set to Auto, which follows the device rate automatically.
- Cubase's project sample rate — Project → Project Setup → Sample Rate (shortcut Shift+S).
All three must be the same value. 48 kHz is fine for most content (YouTube, Zoom, video editing). 96 kHz if you're capturing Hi-Res Lossless music for archival or mastering reference work.
Mismatched rates cause crackling. If your device is at 96 kHz but your Cubase project is at 48 kHz (or vice versa), the recorded audio will have crackling artifacts at every buffer boundary. The recording looks clean in the waveform view but sounds wrong. Match the rates first; everything else just works after that.
Section A — Using AudioRoute Capture FX (Audio Effect)
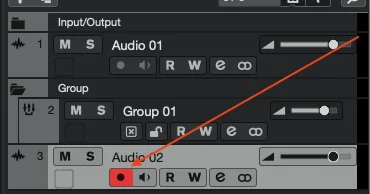
This is the recommended workflow for new sessions. AudioRoute Capture FX inserts on a regular Audio Track and replaces whatever's coming in with system audio from the AR daemon. A Group Track sits between the processing Audio Track and a second Audio Track that does the actual recording, with the Group's output set to No Bus to prevent feedback. (Cubase's recording engine captures from the input bus of an Audio Track, not the post-Inserts signal of the same track, which is why the Group + second-Audio-Track pattern is needed in either flavour; it's a Cubase quirk, not an AR quirk.)
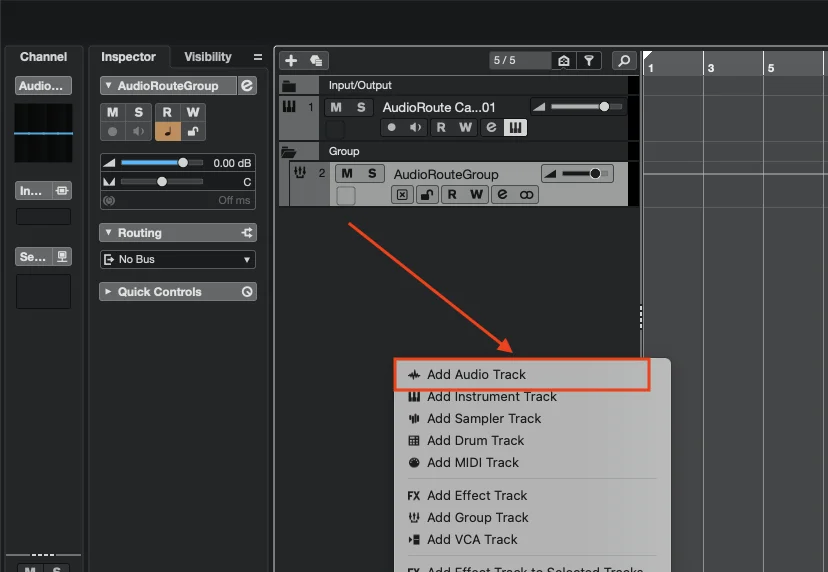
Step 1
Add an Audio Track and insert AudioRoute Capture FX
Right-click in the track list area and pick Add Audio Track. Defaults are fine (Stereo, count 1, no input bus assigned). Cubase names it Audio 01. This is the track that will host the AudioRoute Capture FX plug-in.
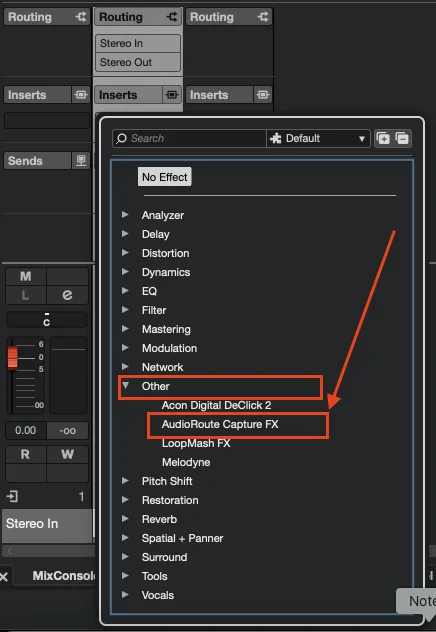
On the Audio 01 channel strip (or via the Inspector on the left), click an empty Inserts slot. The plug-in picker opens. Navigate to:
Other → AudioRoute Capture FX
Cubase categorizes AudioRoute Capture FX under Other rather than Tools at the moment (filed for a future plug-in metadata adjustment); search for "AudioRoute" in the picker as a faster path. The plug-in window opens once it's inserted.
Step 2
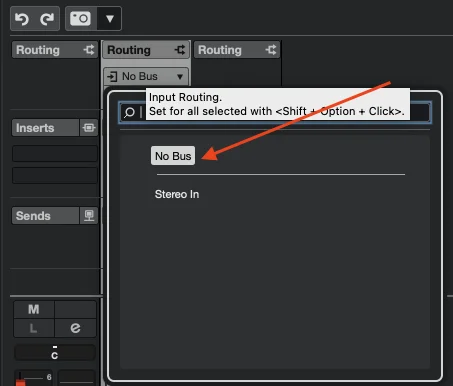
Set the Audio Track's Input Routing to No Bus
Open the Audio 01 Inspector on the left, expand Routing, and click the Input Routing dropdown. Pick No Bus.
No physical input is needed — AudioRoute Capture FX replaces whatever's on the input with system audio from the daemon. Leaving Input Routing as Stereo In would route your audio-interface input into the FX chain alongside the system audio (or instead of it, depending on the daemon's gating), so explicitly clearing it to No Bus avoids surprises.
Step 3
Add a Group Track to the selected Audio Track
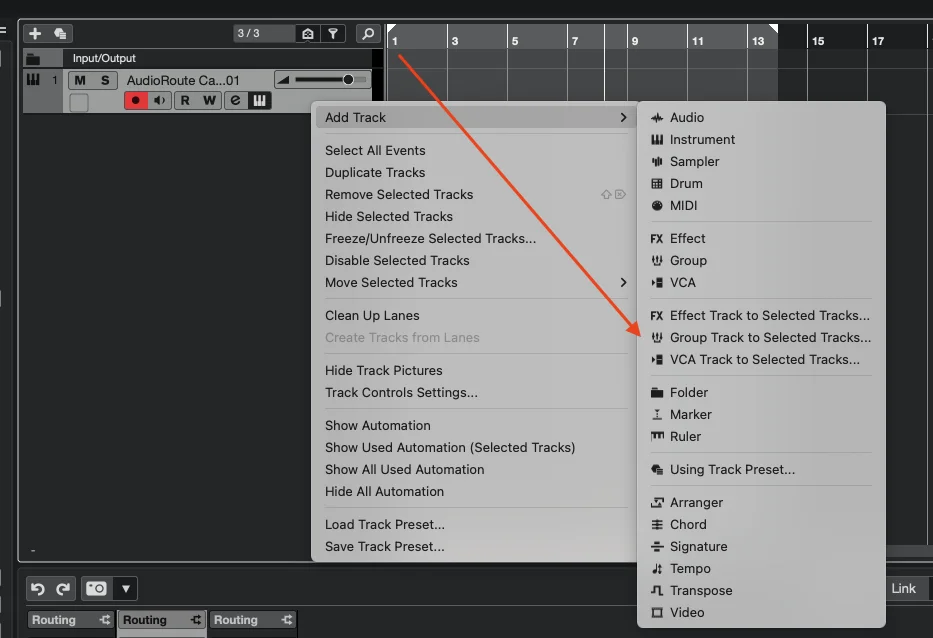
Cubase has a one-click action that creates a Group Track and routes the selected track's output into it. With Audio 01 still selected, right-click on the Audio 01 track header and choose Add Track → Group Track to Selected Tracks.
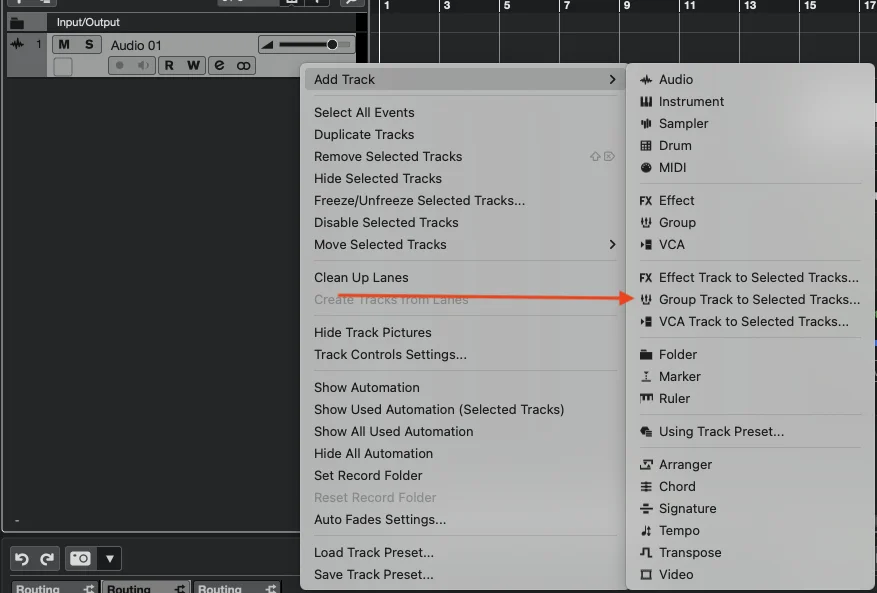
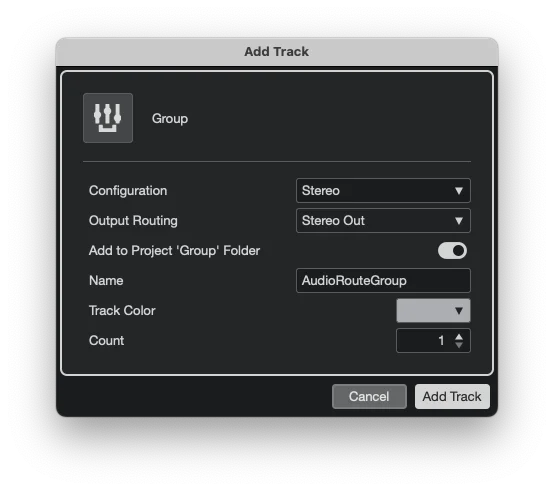
The Add Track dialog appears. Defaults are fine (Stereo configuration); name the Group something like AudioRouteGroup if you want, or leave it as Group 01. Click Add Track.
Step 4
Set the Group's output to No Bus
Cubase routes the new Group's output to Stereo Out by default. We need to change that to No Bus to prevent a feedback loop. With the Group selected, open its Inspector, expand Routing, click the Output Routing dropdown, and pick No Bus.
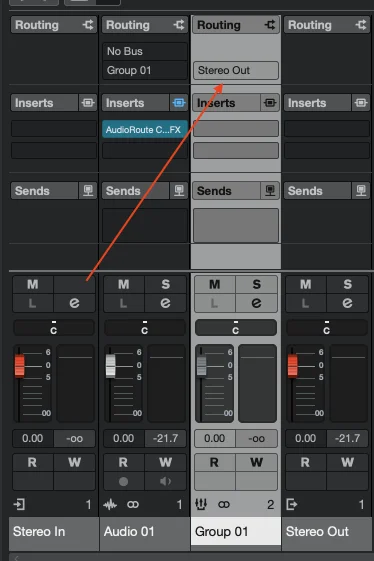
Why this prevents feedback. If the Group routes to Stereo Out, the captured system audio plays through your speakers. AudioRoute's tap would then re-capture that playback, feed it back into the same Group, and create an escalating loop. Setting the Group's output to No Bus breaks the loop at the right point: the next track in this guide will tap the Group's signal pre-output-routing for recording, but nothing reaches the speakers for AR to re-capture.
Step 5
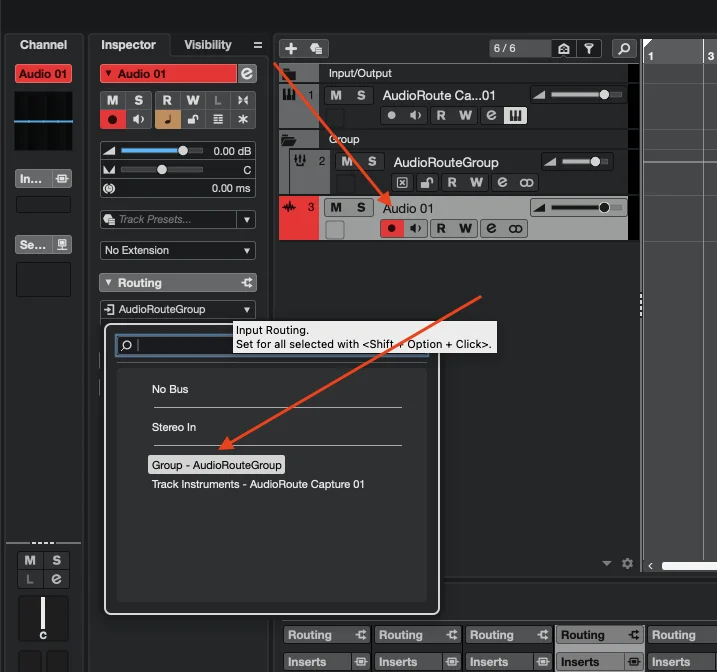
Add a second Audio Track, input from the Group
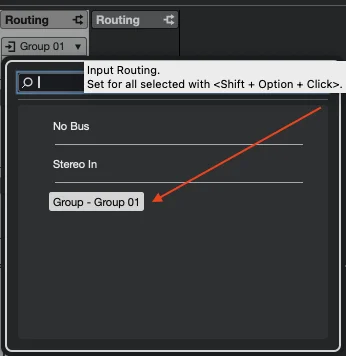
Right-click in the track list area and pick Add Audio Track again. Cubase names it Audio 02. On Audio 02's Inspector:
- Input Routing → Group - Group 01 (or whatever you named the Group). This is what makes Audio 02 actually receive the captured audio.
- Output Routing → No Bus. Same feedback-prevention reasoning — you'd otherwise route the recording track's signal back to your speakers, which AR would re-capture.
Step 6
Arm and record
Click the R button on Audio 02 to record-arm it; the track header turns red. Leave Audio 02's Monitor button (the speaker icon) OFF — the source audio is already playing through your speakers directly via the system path, so monitoring inside Cubase isn't needed.
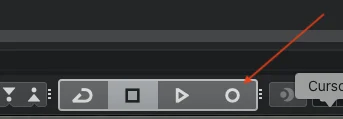
Start your source audio playing (Spotify, browser, Zoom, etc.), then hit the Record button in Cubase's transport (or * on the numeric keypad). A waveform grows in real-time on Audio 02. Click Stop when you're done.

That's the Effect-flavour setup. Save it as a project template — the topology recalls in one open.
Section B — Using AudioRoute Capture (Instrument, for existing sessions)
This is the original AudioRoute Capture plug-in (the Instrument flavour, loaded on a Cubase Instrument Track). Use it if you have a session that loaded AudioRoute before 0.2.0 — it will auto-load with the same plug-in identifier and your existing routing stays intact. For new sessions, prefer Section A above.
Step 1
Add an Instrument Track
In an empty area of the track list (left side of the Cubase project window), right-click and choose Add Instrument Track.

Step 2
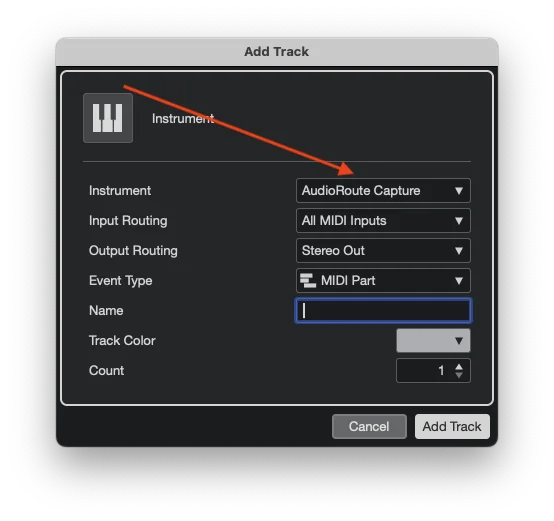
Select AudioRoute Capture as the instrument
The Add Track dialog appears. Click the Instrument dropdown and pick AudioRoute Capture. The other fields can stay at their defaults (Input Routing: All MIDI Inputs, Output Routing: Stereo Out, Event Type: MIDI Part). Click Add Track.
Step 3
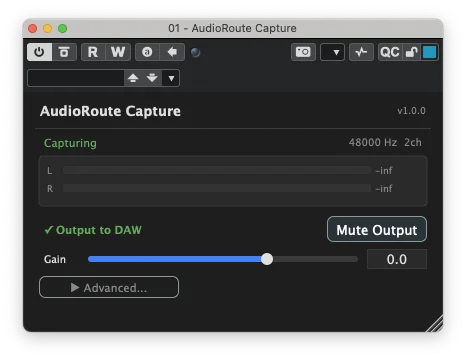
Confirm AudioRoute is capturing
The AudioRoute Capture plugin window opens automatically. Verify three things:
- Status: Capturing — shown in green at the top-left of the plugin window. If you see "Waiting" or "Idle," check that the AudioRoute daemon / tray app is running.
- Output to DAW is enabled — green check next to it.
Play some audio in any other app (Spotify, browser, etc.) and watch the L / R meters in the plugin window. They should bounce. If they don't, AudioRoute isn't seeing system audio — check the tray app's status and macOS / Windows permissions.
Step 4
Add a Group Track linked to the Instrument
The Group Track gives us an intermediate routing stop where Cubase can tap the signal for the Audio Track input without sending it to the master output. Right-click on the AudioRoute Capture Instrument Track (the track header in the track list) and choose Add Track → Group Track to Selected Tracks.
The Add Track dialog appears for the Group. Defaults are fine: Configuration: Stereo, Output Routing: Stereo Out (we'll change this next), name it AudioRouteGroup or similar. Click Add Track.
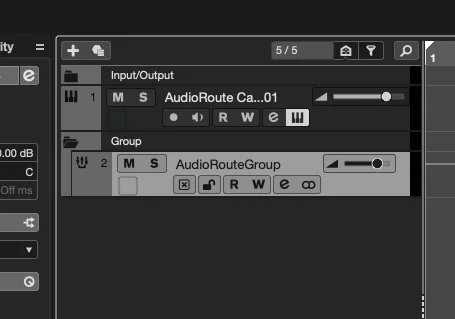
The new Group appears below the Instrument Track. Because we used "Add to Selected Tracks," Cubase has already routed the Instrument Track's output to feed the Group — you don't need to set that manually.
Step 5
Set the Group's output to No Bus
This is the feedback-prevention step. With the Group selected, open its Inspector on the left, expand the Routing section, click the Output Routing dropdown, and pick No Bus.
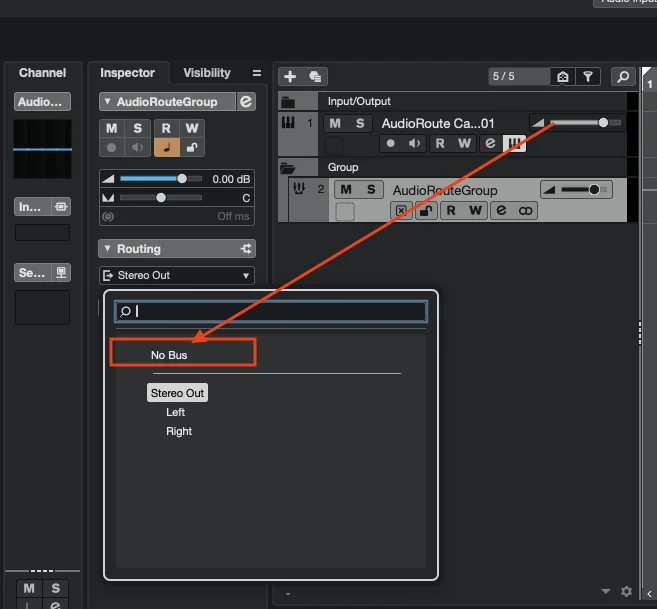
Why this prevents feedback. If the Group routed to Stereo Out, the captured system audio would play through your speakers. AudioRoute's tap would then re-capture that playback, feed it back into the same Group, and create an escalating feedback loop. Setting the Group's output to No Bus breaks the loop at the right point: the Audio Track still receives the signal via Cubase's pre-output-routing tap, but nothing reaches the audio device for AudioRoute to re-capture.
Step 6
Add an Audio Track
Right-click in the track list area → Add Audio Track. The Add Track dialog appears; the defaults (stereo, no input bus assigned yet) are fine. Click Add Track.
Step 7
Set the Audio Track input to the Group, then arm it
With the new Audio Track selected, open its Inspector, expand the Routing section, and click the Input Routing dropdown. Pick Group - AudioRouteGroup (the Group you created in Step 4).
Then click the R button on the Audio Track to record-arm it. The track header should turn red.
Leave the Audio Track's Monitor button (the speaker icon) OFF. You don't need to monitor the input through Cubase because the source audio is already playing through your speakers directly — AudioRoute observes it without interrupting it.
Step 8
Hit Record
Now you're recording. Start your source audio playing (Spotify, browser, Zoom, whatever), then click the Record button in Cubase's transport (the red circle next to Play). Or hit the keyboard shortcut * on the numeric keypad.
A waveform grows in real-time on the Audio Track as the system audio is captured. Click Stop when you're done.
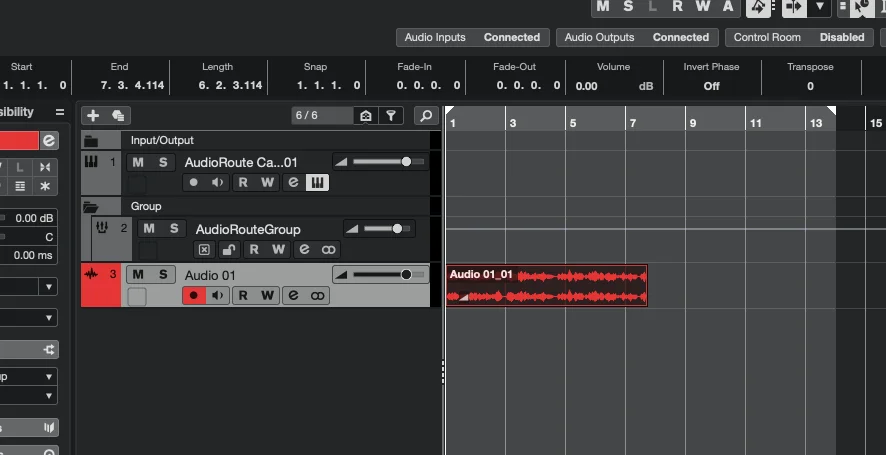
The clip is now a regular Cubase audio event — trim it, fade it, drag it around the timeline, apply inserts, render to disk. Standard Cubase workflow from here.
Common gotchas
The recorded audio crackles or has clicks
Sample rate mismatch. The most common cause: your audio device is running at one rate (e.g. 96 kHz) and your Cubase project is at another (e.g. 48 kHz). The audio is being silently resampled and you're hearing the artifacts at every buffer boundary.
Fix: match all three rates — device, AudioRoute (Auto), Cubase Project Setup. See the Match the sample rates first section above.
Render in Place produces a few hundred milliseconds of audio and stops
Render in Place renders offline — Cubase asks the plugin to produce audio as fast as possible, not at real-time speed. AudioRoute's source is the live system audio tap, which only produces audio at real-time speed. The first few hundred milliseconds happen to be in the shared memory ring buffer at the moment of render; the rest is silence. Don't use Render in Place for AudioRoute; use the Group + Audio Track recording workflow above.
Plugin sandboxing in Cubase
Cubase 12+ enables VST3 plugin sandboxing by default. AudioRoute's Feedback Protection feature relies on the plugin reporting its host process ID to the daemon so the daemon can exclude Cubase from the audio tap. Under sandboxing, the plugin reports the sandbox helper process instead of Cubase itself, which means automatic feedback protection doesn't fully engage.
The Group + No Bus routing in this guide prevents feedback regardless — that's why we use it. If you want the AudioRoute Capture audio to also play through your Stereo Out (for live monitoring), additionally disable plugin sandboxing in Studio → Studio Setup → VST Audio System → Activate VST3 Plug-In Sandboxing (uncheck). We're shipping a code-side fix in an upcoming release that will make this step unnecessary.
I can't find AudioRoute in the VST3 plugin list
As of 0.2.0 there are two bundles: AudioRoute Capture FX.vst3 (Effect, appears under Inserts → Other on Audio Tracks) and AudioRoute Capture.vst3 (Instrument, appears in the Instrument dropdown when adding an Instrument Track). If neither is showing up: Studio → VST Plug-in Manager → Update / Rescan. If still not present, check the plug-in install paths: on Mac, both should be under /Library/Audio/Plug-Ins/VST3/; on Windows, C:\Program Files\Common Files\VST3\. If only one is present, the installer didn't ship both — reinstall AudioRoute 0.2.0 or later.
The Audio Track input meter doesn't move
Two likely causes:
- The Instrument Track's output isn't routing to the Group. Check the Instrument's Routing section in the Inspector — Output Routing should show the Group name (it normally gets auto-wired when you used "Add Group Track to Selected Tracks").
- The Audio Track's Input Routing isn't set to the Group. Check the Audio Track's Routing section in the Inspector.
If both are correct and the AudioRoute plugin window shows meters bouncing but the Audio Track input meter is dead, restart Cubase — occasionally Cubase's internal routing graph needs a refresh after adding a new Group.
Shortcut: skip Cubase, capture straight to WAV
If you just want a clean recording of system audio to drag into your project later, the simplest path is the AudioRoute tray app:
- Click the AudioRoute icon in your menu bar (Mac) or system tray (Windows).
- Hit Record — or use the global keyboard shortcut.
- Play your source audio.
- Hit Stop.
- The WAV file lands in
~/Music/AudioRoute/(Mac) or%USERPROFILE%\Music\AudioRoute\(Windows), 32-bit float, at the device's native rate. - Drag the WAV onto an Audio Track in Cubase, or
File → Import → Audio File.
This skips Cubase's routing entirely. Good when "I want a recording of this" is the goal and the project context isn't important. The 8-step in-DAW workflow above is for when you specifically need system audio inside an active Cubase session alongside other tracks.
Related guides
- Record system audio in Logic Pro — the Logic equivalent, simpler routing because of Logic's bus model.
- Record system audio in Ableton Live — Ableton's "Audio From: Track X" routing makes this even more direct.
- Record system audio in Reaper — Reaper's flexible track routing makes this trivial.
- Record system audio in GarageBand — the free-DAW alternative on Mac.
- Bit-perfect system audio capture on Windows — if you specifically need sample-identical recordings on Windows.
- Bit-perfect system audio capture on Mac — the Mac equivalent, with the honest writeup of Apple's process-tap API limits.
- How AudioRoute works under the hood — the daemon, the tap, the ring buffer, and the routing model.
Stuck on the Cubase setup?
The Group / No Bus / Audio Track input pattern can be finicky — if your setup matches the screenshots but recording still isn't working, drop us a line.
Email support Back to guides