Home / Guides / Record System Audio in Acoustica
How to Record System Audio in Acoustica
Acoustica doesn't expose system audio as a recording source on its own — like every Mac audio app, it can only record from physical inputs (microphone, line in, etc.). With AudioRoute installed, a virtual audio device called AudioRoute Input shows up in Acoustica's source list. Pick that, and the audio Acoustica records is whatever your Mac is playing — a YouTube tab, Spotify, a Zoom call, anything. Six-step walkthrough below.
Acoustica can't record system audio on its own — like every Mac app it only records from physical inputs. Install AudioRoute and its virtual "AudioRoute Input" device appears in Acoustica's source list; select it and Acoustica records whatever your Mac is playing (YouTube, Spotify, a Zoom call, anything).
- Start a new recording in Acoustica and pick 48000 Hz / stereo.
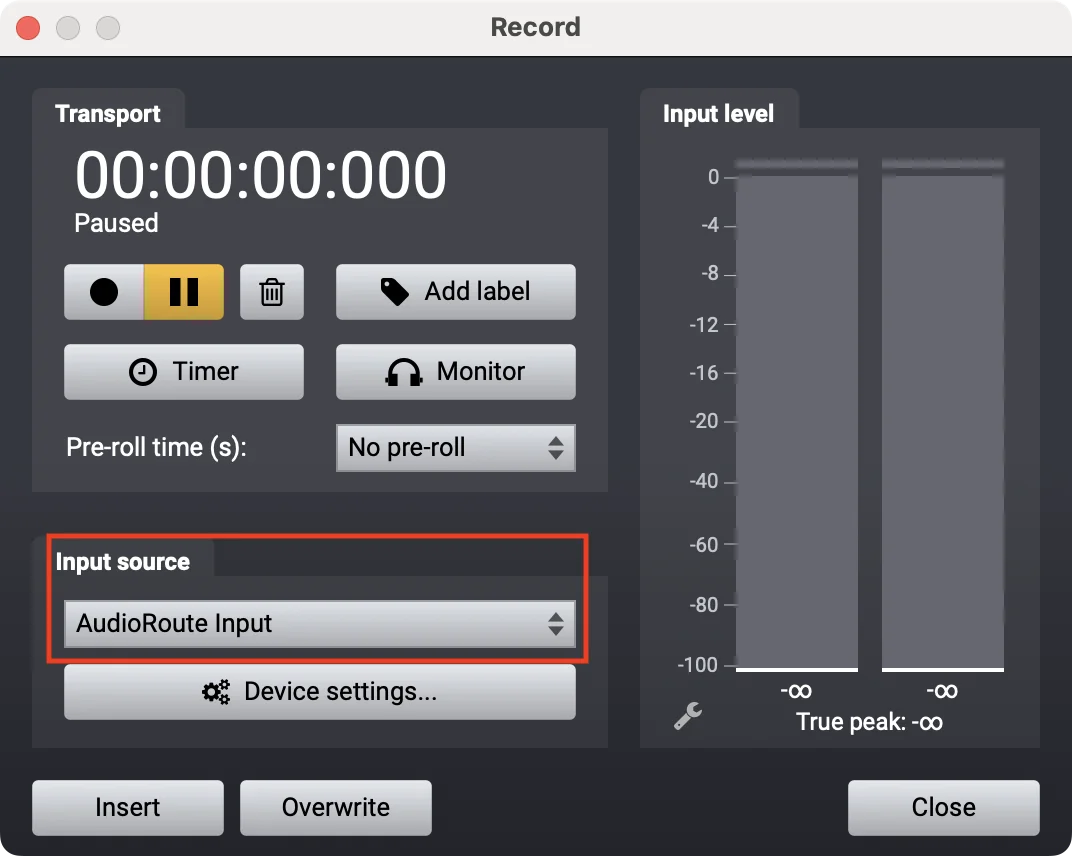
- Set the Input source to AudioRoute Input.
- In Device settings, pin the sample rate (e.g. 48000) instead of "Adapt".
- Play system audio and confirm the input meters move (grant Acoustica Microphone permission in System Settings if they're flat).
- Click the red Record button.
- Insert or Overwrite the capture into your project.
Prefer to capture and drag it in? This guide covers the live-to-track flow. If you'd rather record the audio and drag the finished clip straight onto a track, the drag-and-drop workflow works the same in every DAW.
What you'll need
- macOS 14.2 (Sonoma) or later — AudioRoute uses the Core Audio process-tap APIs Apple shipped in macOS 14.
- Acoustica 7 or later — the workflow below was tested in Acoustica 7 Premium. Older versions have the same Record dialog.
- AudioRoute installed, with the daemon running — the free 14-day trial is enough to test the whole flow. €39 lifetime once you're sold.
AudioRoute installs a system-wide virtual audio device called AudioRoute Input. After installation it shows up in any Mac app that can pick an audio input device — Acoustica, Audacity, OBS, GarageBand, Zoom, Discord, etc. The rest of this guide is just pointing Acoustica at it.
Step 1
Start a new recording
In Acoustica, start a new recording (File → Record, or the red record button in the toolbar). The first thing Acoustica asks is what audio format to capture in. Pick 48000 Hz and 2 (stereo) — that matches what macOS sends through the AudioRoute Input device.
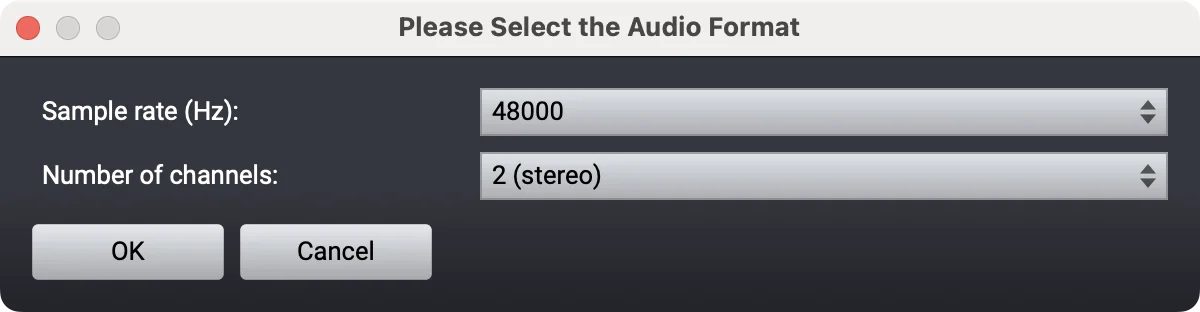
Click OK. Acoustica opens the Record window.
Step 2
Pick AudioRoute Input as the source
In the Record window, find the Input source dropdown near the bottom-left. By default it'll be your Mac's built-in mic or your audio interface input. Click the dropdown and select AudioRoute Input.
Step 3
Pin the sample rate in Device settings
Click Device settings... directly under the Input source dropdown. The Audio device settings window opens. The setting that matters is Sample rate — set it to a fixed value (e.g., 48000) instead of leaving it on Adapt.
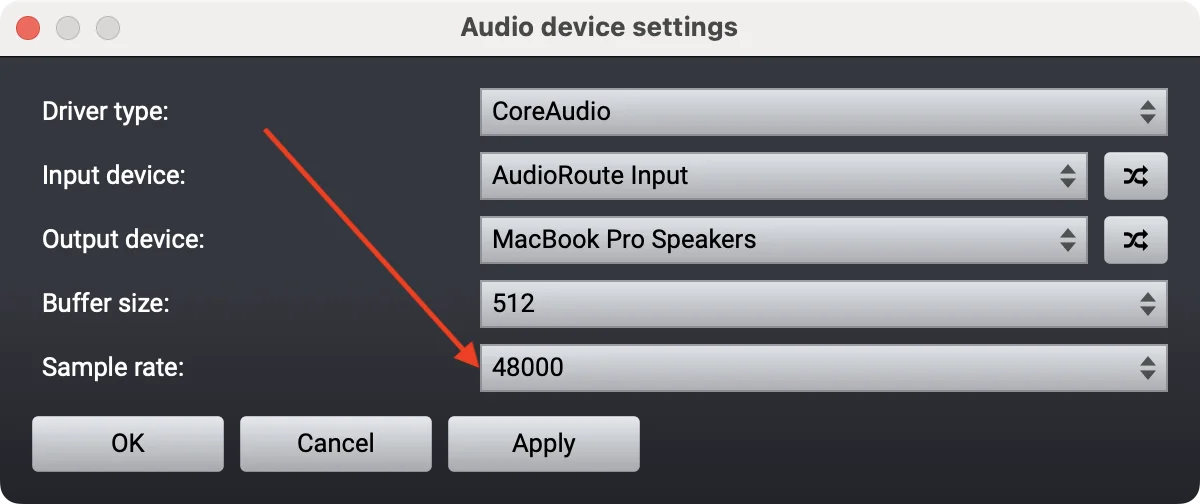
Why not "Adapt"? The Adapt option tells Acoustica to convert the incoming sample rate to whatever the project rate is on the fly. Real-time resampling adds small artifacts — subtle distortion, occasional clicks at buffer boundaries. Pinning the rate keeps the signal bit-for-bit clean from source to file.
Click Apply, then OK to close the device settings.
Step 4
Verify the input meters move
Now play some audio on your Mac — open a YouTube tab, hit play in Spotify, anything. The Input level meters on the right of the Record window should react. Green when quiet, yellow when louder, red at the top before clipping.
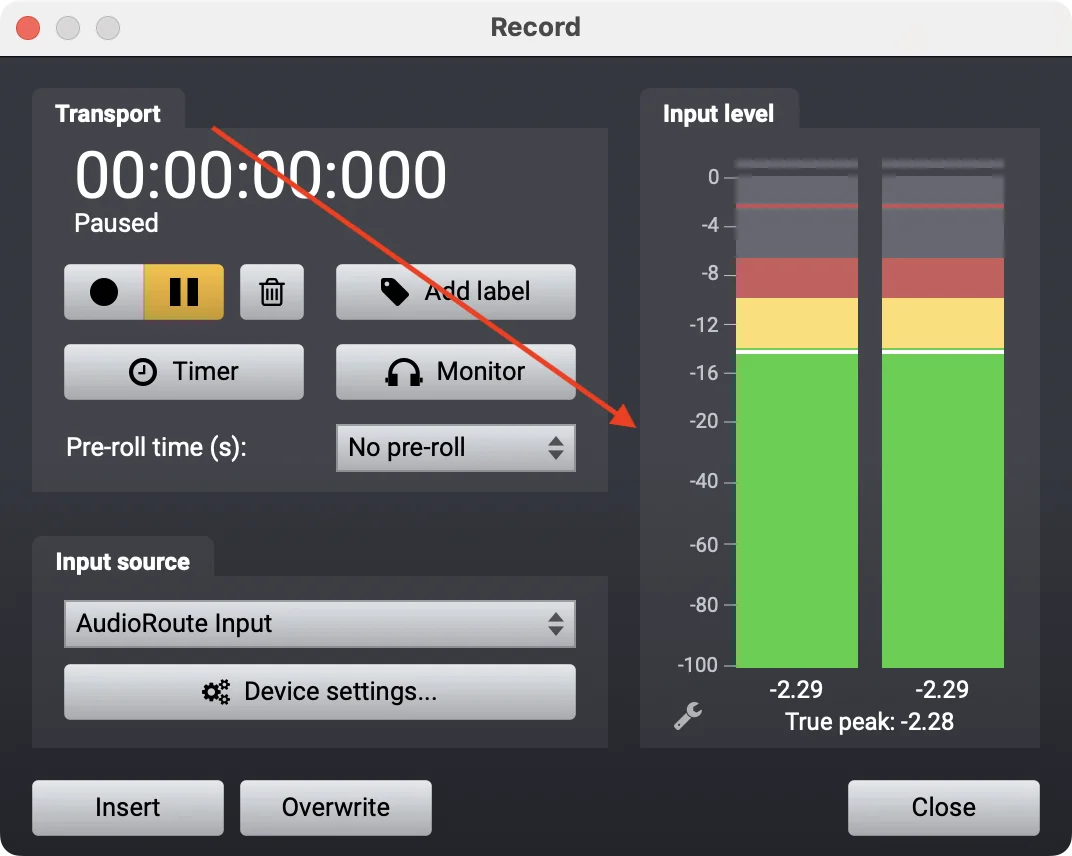
If audio IS playing but the meters are flat at -∞, jump to the microphone permission section below before you record — you're hitting macOS's mic permission gate.
Troubleshooting: Acoustica needs microphone permission
This is the single most common gotcha. Because AudioRoute Input registers itself as an audio input device, macOS treats it the same as a microphone for privacy purposes. Until you've granted Acoustica permission to use the microphone, it will load AudioRoute Input but read silence from it — meters flat, recordings empty.
To grant permission:
- Open System Settings → Privacy & Security → Microphone.
- Find Acoustica in the list.
- Toggle it on.
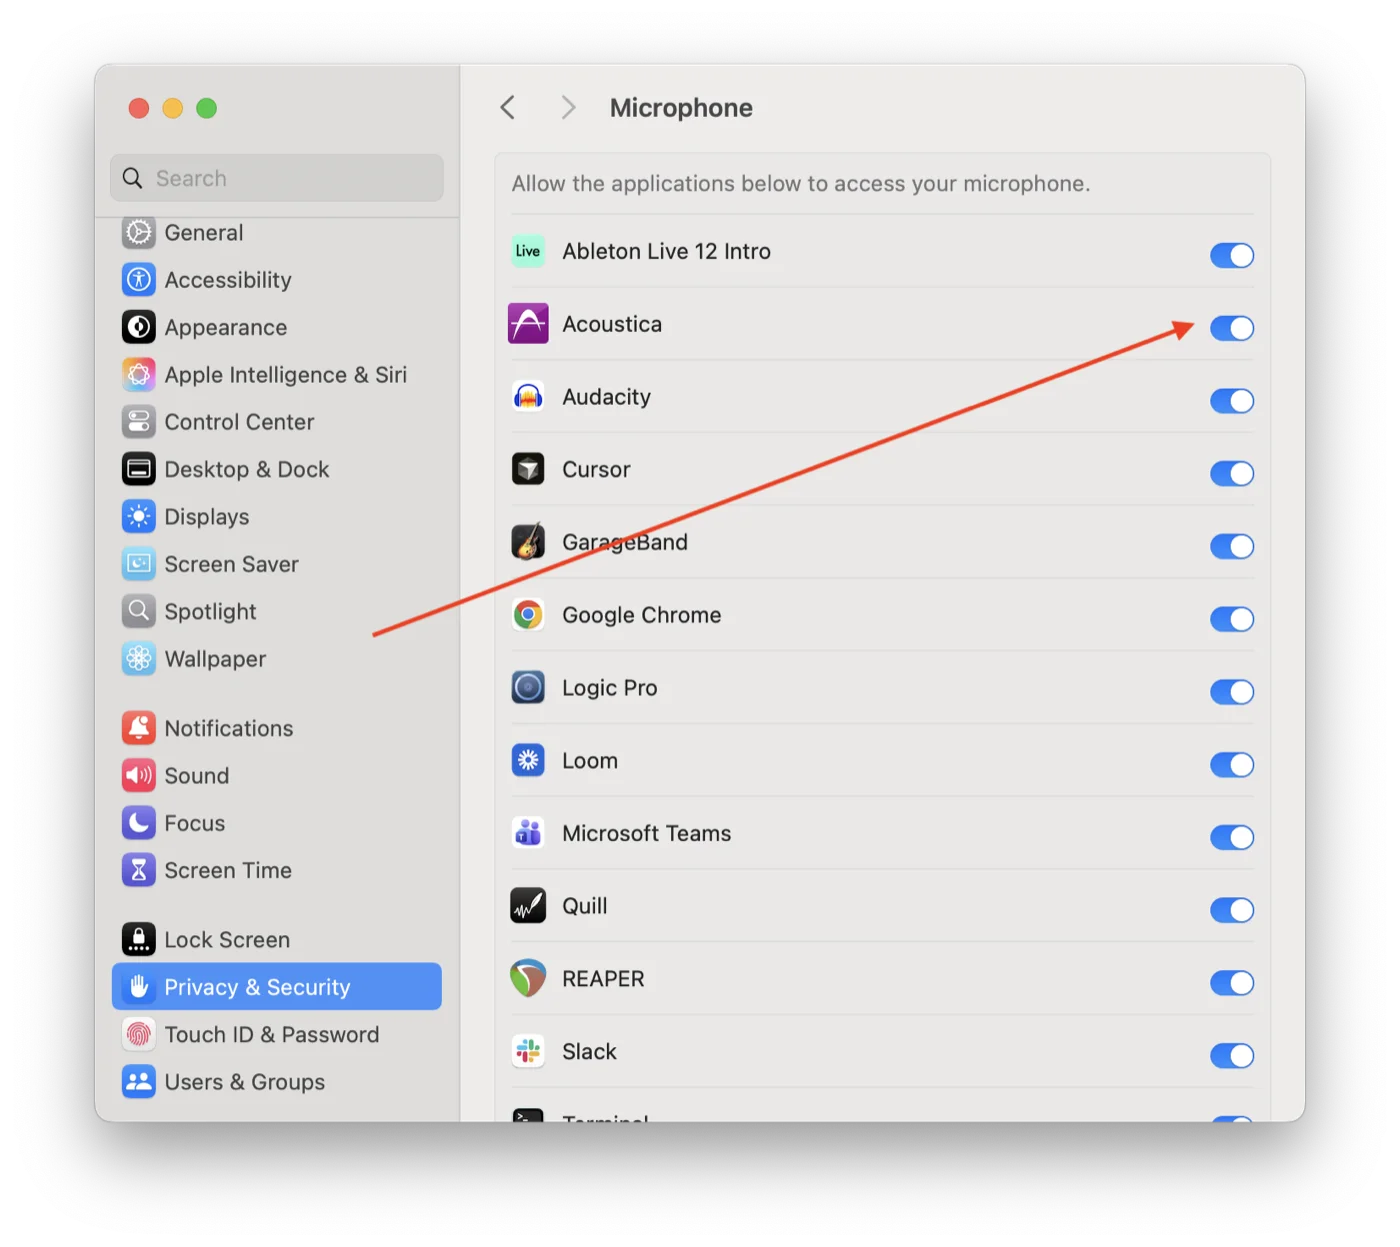
Switch back to Acoustica. The Input meters should now react to system audio playback.
Why does an app need mic permission to record system audio? macOS treats every audio input device the same way, regardless of whether it's a physical mic or a software-defined virtual device like AudioRoute Input. Apple's privacy model requires explicit consent for any app that wants to read from "the microphone" — that's the system gate AudioRoute can't bypass. Once Acoustica has the permission, future recordings work without prompting again.
Step 5
Click the red Record button
With meters moving, click the red Record button in the Record window's Transport section. The transport time starts counting, and Acoustica is now capturing whatever your Mac is playing.
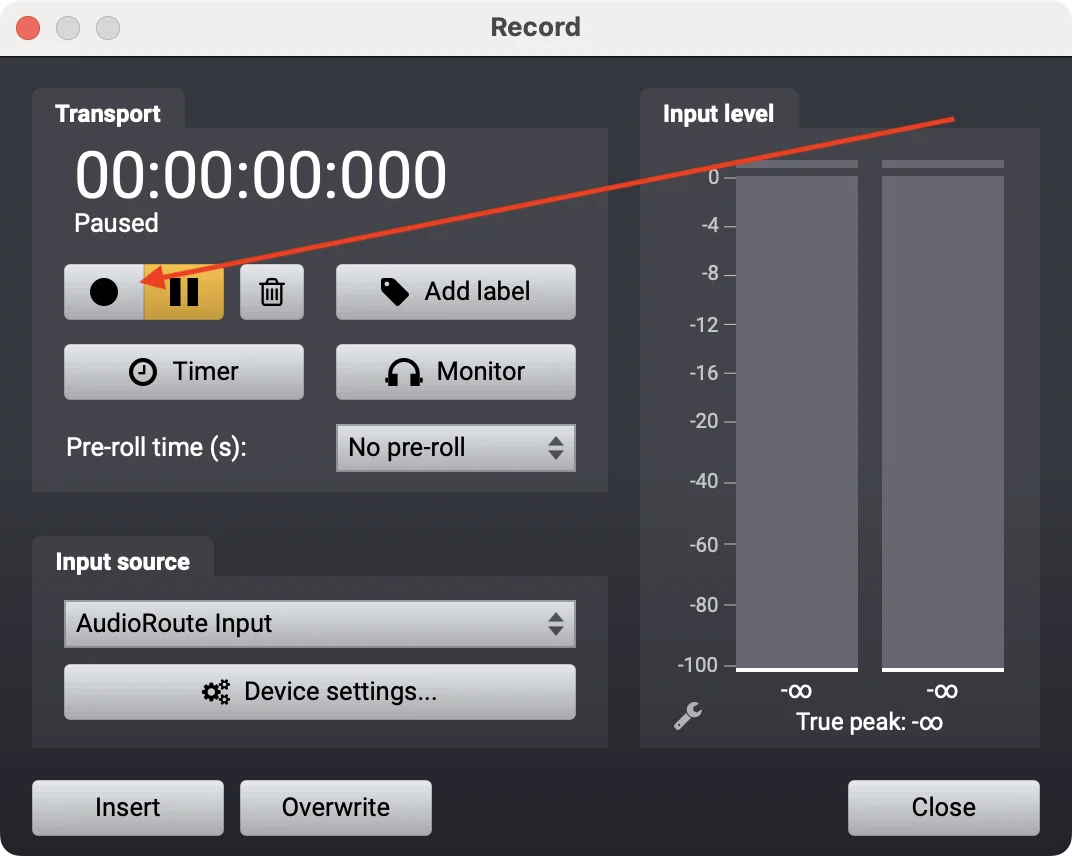
You can pause and resume as needed. The pre-roll and timer options (above the Input source dropdown) let you schedule a record or pad the beginning with silence if you want.
Step 6
Insert or Overwrite into the project
When you've captured what you want, hit Pause. Then choose how to commit the recording into your Acoustica project:
- Insert — appends the recording at the current playhead position, pushing existing content to the right.
- Overwrite — replaces existing audio at the playhead position with the new recording.
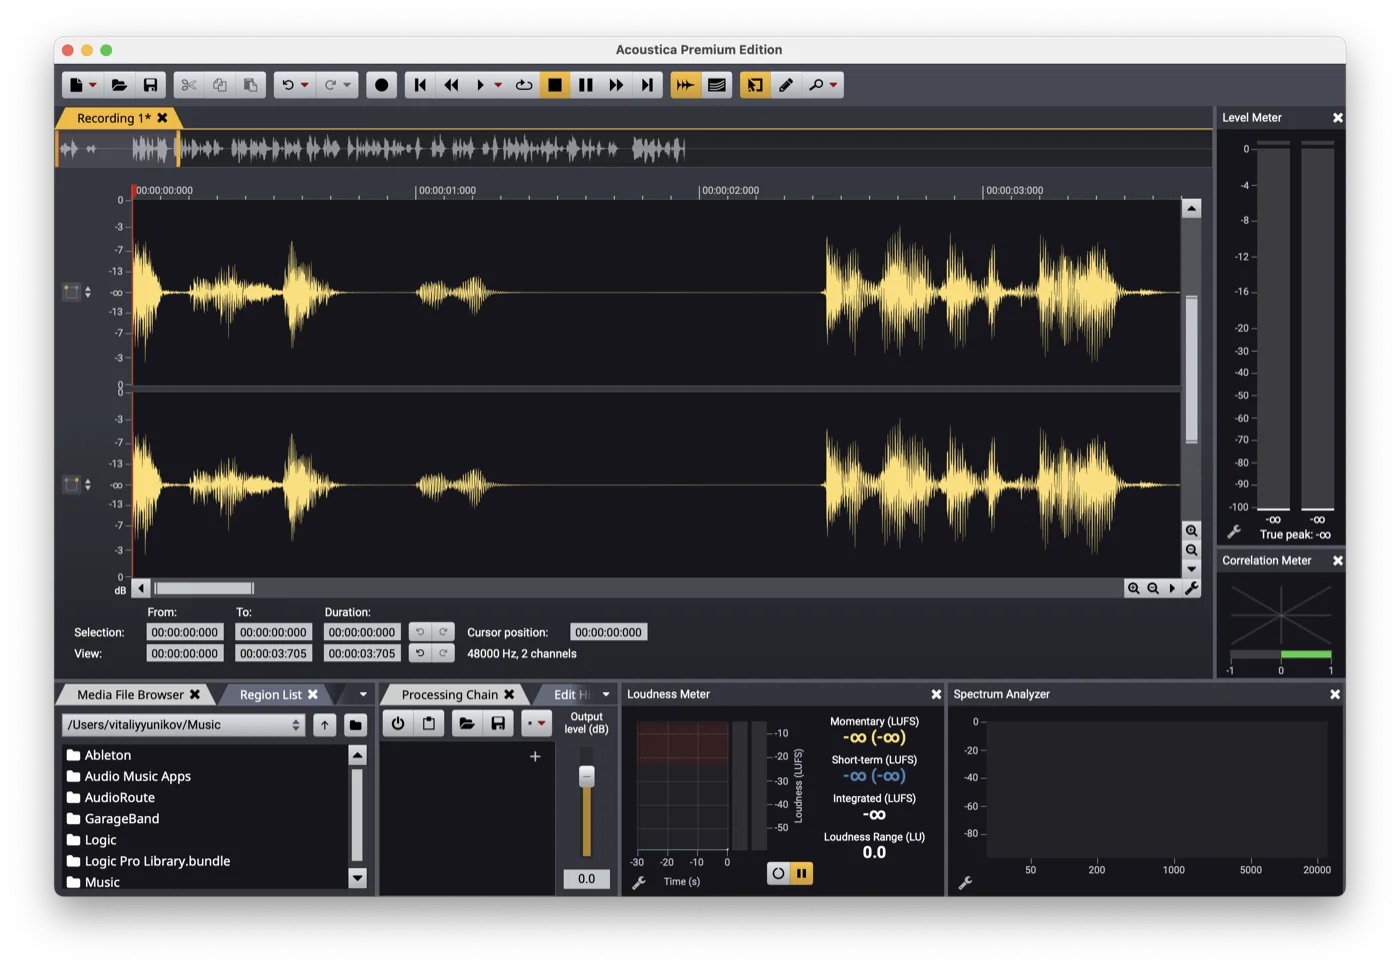
Either way, the new waveform appears in the project window and you can edit it like any other audio in Acoustica — cut, fade, EQ, normalise, whatever your workflow needs.
What else AudioRoute can do
Acoustica is one of many apps that can read from AudioRoute Input. The same virtual device works as a source in:
- Audacity, OBS, ScreenFlow, QuickTime — any app with a "record from input device" workflow
- Zoom, Discord, Slack — pipe system audio into a call (great for screen-shares with audio)
- GarageBand, Logic Pro, Ableton Live — though for DAWs the AR Capture plugin is usually the cleaner path
If you just need a WAV file of what's playing on your Mac without opening Acoustica, AudioRoute can record directly from its menu-bar app. See the Record System Audio on Mac (no DAW required) guide for that.
Related guides
- Capture audio and drag it into any DAW — the universal drag-and-drop workflow.
- Record system audio on Mac (no DAW required) — the simplest workflow if you don't need Acoustica's editor.
- Record system audio in Logic Pro — the DAW alternative on Mac.
- Record system audio in Ableton Live — same idea, Ableton-specific routing.
- Record system audio in Reaper — cross-platform DAW workflow.
- Record system audio in Cubase — the Cubase Pro / Artist routing version.
- Record system audio in GarageBand — free-DAW alternative on Mac if you don't need a full editor.
- AudioRoute vs BlackHole — comparison + 5-minute migration if you're coming from BlackHole.
Don't have AudioRoute yet?
Free 14-day trial. No card required, no signup. Just download and Acoustica picks up AudioRoute Input on next launch.
Download free trial All guides