Home / Guides / Record system audio in Bitwig Studio
How to Record System Audio in Bitwig Studio
Bitwig Studio has no built-in way to record system audio — whatever's playing through Spotify, YouTube, Zoom, your browser, or any other app — onto a track. This guide walks through it with AudioRoute's VST3 plug-in. Bitwig makes it especially clean: you can tap the plug-in's output directly as another track's input, so there's no bus to set up, no aggregate device, and no Audio MIDI Setup. The whole thing takes a couple of minutes. Screenshots are from Bitwig on macOS; the workflow is identical on Windows (use Ctrl where the shortcuts say Cmd).
Bitwig Studio has no built-in system-audio recorder, but AudioRoute makes it especially clean — no bus, no aggregate device, no Audio MIDI Setup. Drop the AudioRoute Capture FX plug-in on an audio track, then tap its output directly as a second track's input to record.
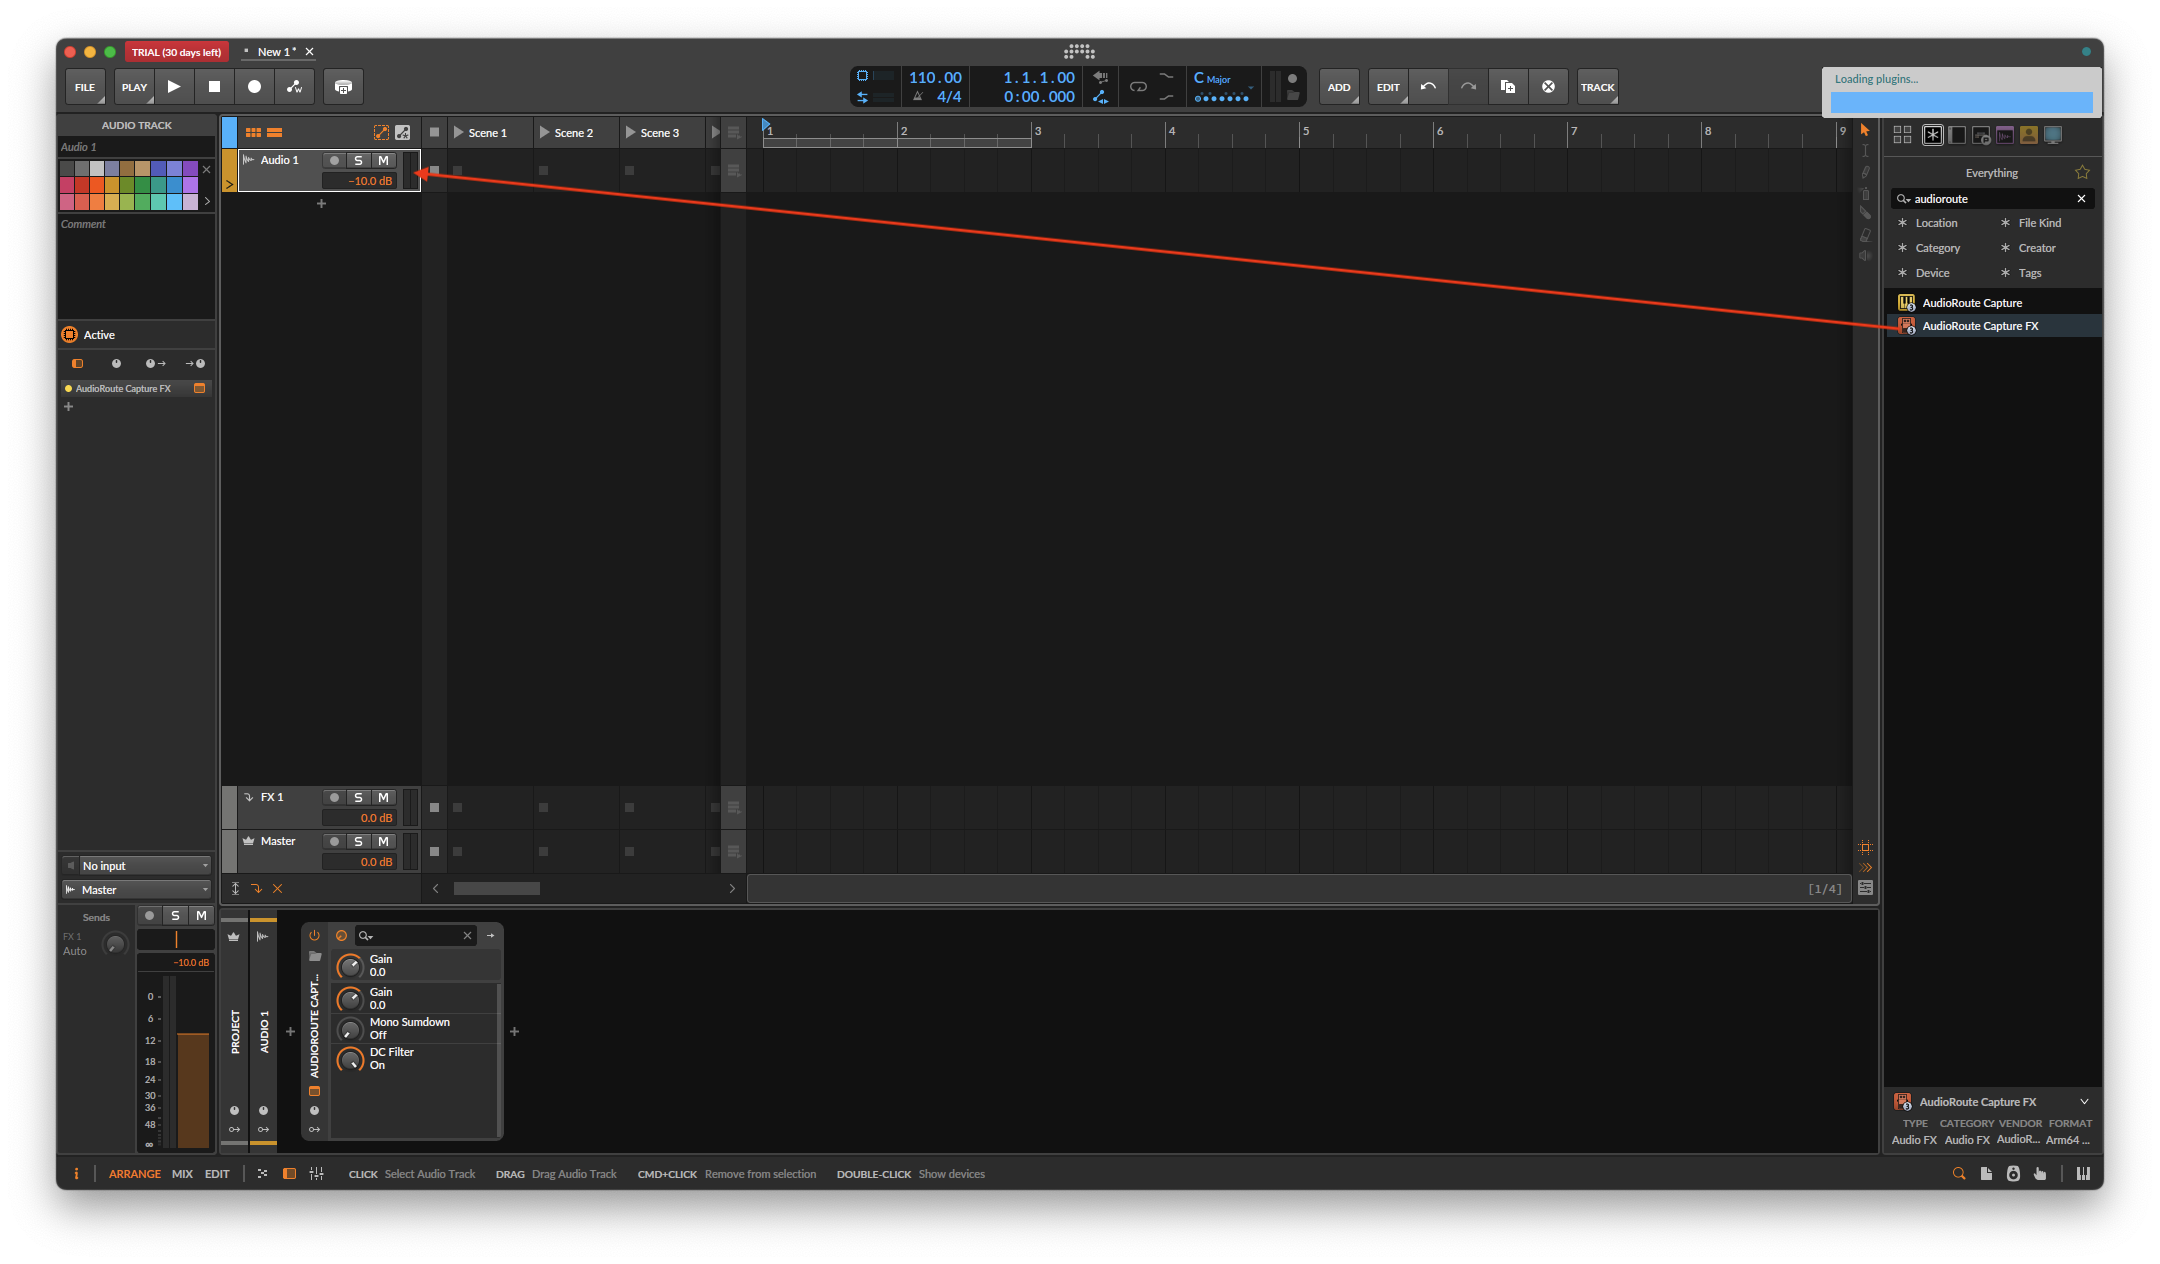
- Drag AudioRoute Capture FX from the plug-in browser onto an audio track (Audio 1), then set that track's output to No output.
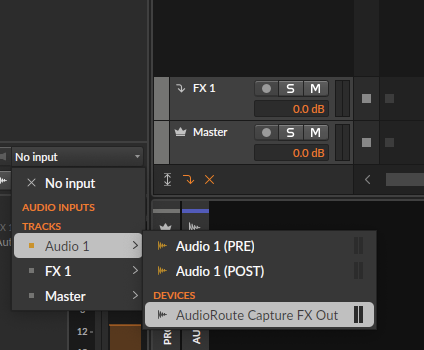
- Add a second audio track and set its input to Audio 1 → AudioRoute Capture FX Out.
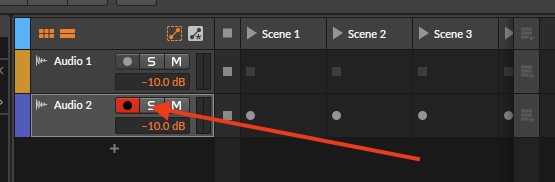
- Record-arm the second track, then press global Record and Play — the capture lands as a normal clip.
Prefer to capture and drag it in? This guide covers the live-to-track flow. If you'd rather record the audio and drag the finished clip straight onto a track, the drag-and-drop workflow works the same in every DAW.
Why this is hard by default
Bitwig records audio from any input path — an interface, another track, a mic. But "system audio" isn't an input. Your OS routes whatever's playing through your selected output (speakers, headphones, an interface), and there's no built-in "system output as input" device to record from.
The usual workarounds treat this as a routing problem: install a virtual audio device that pretends to be a speaker, then redirect your system output into it. On Mac that's BlackHole plus an aggregate device in Audio MIDI Setup; on Windows it's VB-Cable or VoiceMeeter. Both work, but they hijack your output routing and break the moment you switch devices.
AudioRoute takes a different approach: instead of rerouting your output, it quietly observes whatever your system is already playing and delivers a parallel copy into Bitwig. Your speakers, headphones, or interface keep working exactly as before. More on how it works under the hood if you're curious.
What you'll need
- macOS 14.2 (Sonoma) or later, or Windows 10 (build 20348) or later.
- Bitwig Studio — this guide was written using Bitwig 5 on macOS; any recent version works the same way, and the flow is identical on Windows (use Ctrl for the Cmd shortcuts).
- AudioRoute — the free 14-day trial covers the whole workflow. €39 lifetime license. Bitwig loads the VST3 plug-in, which installs to
/Library/Audio/Plug-Ins/VST3/on macOS andC:\Program Files\Common Files\VST3\on Windows.
If AudioRoute doesn't appear in the browser right after installing, quit and relaunch Bitwig (or rescan plug-ins in Settings → Plug-ins) — it picks up new plug-ins on scan.
Step-by-step
Step 1
Find AudioRoute in the plug-in browser
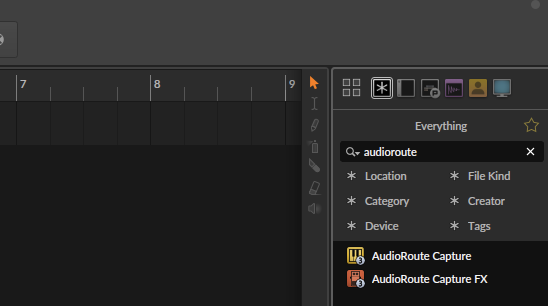
Open the browser panel on the right and type AudioRoute in the search box. You'll see two devices: AudioRoute Capture (an instrument) and AudioRoute Capture FX (an audio effect). For recording onto an audio track, use AudioRoute Capture FX.
Step 2
Drop it onto an audio track
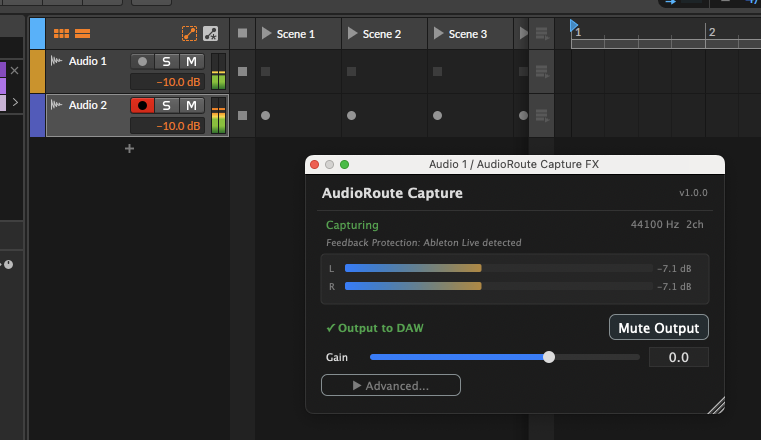
Drag AudioRoute Capture FX from the browser onto an audio track (here it's Audio 1). It loads into the track's device chain, and the AudioRoute window shows Capturing with a green ✓ Output to DAW — it's already sending captured system audio into the track. Play something on your system and the L/R meters will move.
Step 3
Set that track's output to No output
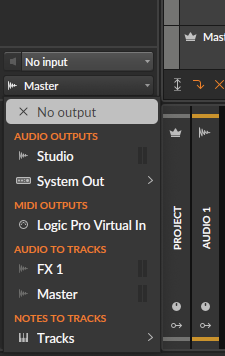
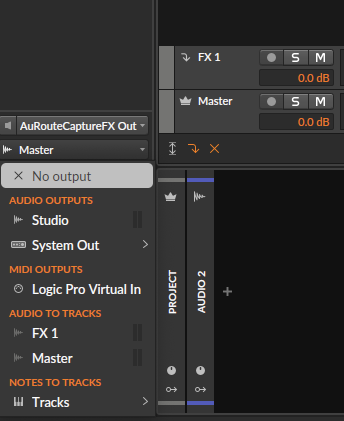
We don't want this track going straight to your speakers — we want to record its output on another track. Click the track's output selector and choose No output. This stops Bitwig from playing the captured audio back through your monitors (which would cause an echo).
Step 4
Add a second audio track
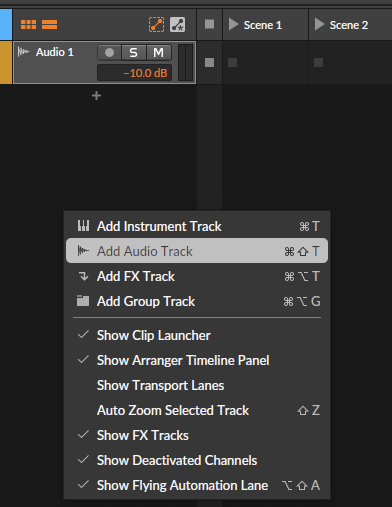
Right-click an empty area of the track list and choose Add Audio Track (Cmd+Shift+T). This second track — Audio 2 — is the one you'll actually record onto.
Step 5
Set the record track's input to the plug-in output
Here's the elegant Bitwig part — no bus needed. Click Audio 2's input selector, then choose Audio 1 → AudioRoute Capture FX Out (it appears under Devices for that track). Audio 2 now takes its signal directly from the AudioRoute plug-in's output on Audio 1.
Step 6
(Optional) Set the record track's output to No output
You can also set Audio 2's output to No output so you don't hear the captured audio a second time while recording. This is purely about monitoring comfort — it's optional. AudioRoute's feedback protection already excludes Bitwig's own output from what it captures, so the audio playing back is never fed into the recording either way. Leaving Audio 2 pointed at your speakers just means you'll hear it; the recorded file is clean regardless.
Step 7
Record-arm the record track
Click the record-arm button on Audio 2 so it lights red. This is the track the audio will be written to.
Step 8
Check the meters
Play something on your system and confirm the signal is live before you commit a take. You should see the L/R meters move in the AudioRoute Capture window, and the level meters move on both Audio 1 and Audio 2. If the meters are moving, the capture is working.
Step 9
Record
Press the global Record button in the transport, then Play — recording starts. Play whatever you want to capture on your system.
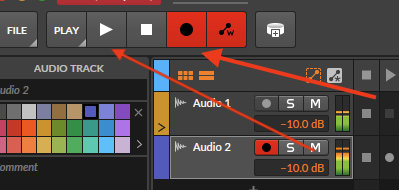
Press Stop (Spacebar) when you're done. The captured audio lands on Audio 2 as a normal audio clip on the timeline — edit it, bounce it, or drag it wherever you like.

Listening back to your recording
To hear the take, set Audio 2's output back to Master (or your main output) and press Play. You don't have to worry about AudioRoute re-capturing the playback: its feedback protection automatically excludes Bitwig's own output from what it captures, so playing back your recording won't feed it into a new capture.
Common gotchas
An echo while recording
If you hear a doubled/echoey sound during the take, it's a track monitoring the captured audio back through your speakers. Set the output of Audio 1 (and optionally Audio 2) to No output as in Steps 3 and 6 — the recording is clean regardless, No output just silences the monitor path. Or simply wear headphones.
The recording is silent
Check three things: (1) something is actually playing through your system output; (2) the AudioRoute Capture window shows a green ✓ Output to DAW, not a muted state; and (3) Audio 2's input is set to Audio 1 → AudioRoute Capture FX Out. A wrong input choice is the most common cause of a silent take.
What does "Mute Output" in the plug-in do?
The Mute Output button inside the AudioRoute Capture window stops the plug-in from sending audio into Bitwig entirely — it's for when you only want AudioRoute's standalone tray recorder or virtual device. Leave it off when recording into Bitwig, or Audio 2 will record silence.
Recording sounds quiet or too loud
The plug-in passes audio at unity by default. Check the Gain slider in the AudioRoute window — it should read 0.0 dB unless you've changed it. The L/R meter levels in the plug-in are exactly what gets written to Audio 2.
Shortcut: skip Bitwig, capture straight to WAV
If you just need a WAV of what's playing and don't need to edit in Bitwig, AudioRoute can record it directly from the tray/menu-bar app — no project, no track routing, no arming.
Click the AudioRoute icon in your menu bar (macOS) or system tray (Windows) → Start Recording. It captures to ~/Music/AudioRoute/ by default. Click Stop Recording when done. Same engine under the hood, zero DAW setup — handy for quick one-offs.
Related guides
- Capture audio and drag it into any DAW — the universal drag-and-drop workflow.
- Record system audio on Mac (no DAW required) — the simplest workflow when you don't need a DAW in the loop.
- Record system audio in Ableton Live — the Live-specific routing.
- Record system audio in Logic Pro — the Logic version.
- Record system audio in Pro Tools — the AAX / bus-routing version.
- AudioRoute vs BlackHole — honest comparison and 5-minute migration.
Try AudioRoute on your next Bitwig project
Free 14-day trial, no credit card. €39 lifetime license, all future updates included.
Download free trial View pricing